
Complex web applications use animations when transitioning between states. These animations help users understand the state change and they improve visual polish by replacing sudden jumps with gradual changes. But to execute these animations smoothly, the browser must minimize time in each animation frame, using GPU acceleration to speed up visual effects and compositing to minimize rendering work.
An animation is a sequence of still pictures shown in quick succession that create an illusion of movement to the human eye.Here movement should be construed broadly to encompass all of the kinds of visual changes humans are used to seeing and good at recognizing—not just movement from side to side, but growing, shrinking, rotating, fading, blurring, and sharpening. The rule is that an animation is not an arbitrary sequence of pictures; the sequence must feel continuous to a human mind trained by experience in the real world. Typical web page animations include changing an element’s color, fading it in or out, or resizing it. Browsers also use animations in response to user actions like scrolling, resizing, and pinch-zooming. Plus, some types of animated media (like videos) can be included in web pages.Video-like animations also include animated images and animated canvases. Since our browser doesn’t support images yet, this topic is beyond the scope of this chapter; video alone has its own fascinating complexities.
In this chapter we’ll focus on animations of web page elements. Let’s
start by writing a simple animation using the
requestAnimationFrame API implemented in Chapter 12.
This method requests that some JavaScript code run on the next frame; to
run repeatedly over many frames, we can just have that JavaScript code
call requestAnimationFrame itself:
function run_animation_frame() {
    if (animate())
        requestAnimationFrame(run_animation_frame);
}
requestAnimationFrame(run_animation_frame);
The animate function then makes some small change to the
page to give the impression of continuous change.It returns true
while it’s animating, and then stops. By changing what
animate does we can change what animation occurs.
For example, we can fade an element in by smoothly transitioning its
opacity value from 0.1 to 0.999.Real browsers apply certain
optimizations when opacity is exactly 1, so real-world websites often
start and end animations at 0.999 so that each frame is drawn the same
way and the animation is smooth. It also avoids visual popping of the
content as it goes in and out of GPU-accelerated mode. I chose 0.999
because the visual difference from 1.0 is imperceptible.
Doing this over 120 frames (about four seconds) means increasing the
opacity by about 0.008 each frame.
So let’s take this div containing some text:
<div>This text fades</div>and write an animate function to incrementally change
its opacity:
var div = document.querySelectorAll("div")[0];
var total_frames = 120;
var current_frame = 0;
var change_per_frame = (0.999 - 0.1) / total_frames;
function animate() {
    current_frame++;
    var new_opacity = current_frame * change_per_frame + 0.1;
    div.style = "opacity:" + new_opacity;
    return current_frame < total_frames;
}
Here’s how it looks; click the buttons to start a fade:
This animation almost runs in our browser, except that we
need to add support for changing an element’s style
attribute from JavaScript. To do that, register a setter on the
style attribute of Node in the JavaScript
runtime:
Object.defineProperty(Node.prototype, 'style', {
    set: function(s) {
        call_python("style_set", this.handle, s.toString());
    }
});
Then, inside the browser, define a handler for
style_set:
class JSContext:
    def __init__(self, tab):
        # ...
        self.interp.export_function("style_set", self.style_set)

     def style_set(self, handle, s):
        elt = self.handle_to_node[handle]
        elt.attributes["style"] = s;
        self.tab.set_needs_render()
Importantly, the style_set function sets the
needs_render flag to make sure that the browser re-renders
the web page with the new style parameter. With these
changes, you should now be able to open and run this animation in your
browser.
The animation pattern presented in this section is yet another
example of the event loop first introduced in Chapter 2 and evolved
further in Chapter 12.
What’s new in this chapter is that we finally have enough tech built up
to actually create meaningful, practical animations. And the same
happened with the web. A whole lot of the APIs for proper animations,
from the requestAnimationFrame API to CSS-native
animations, came onto the scene only in the 2010s.
Try the fade animation in your browser, and you’ll probably notice that it’s not particularly smooth. And that shouldn’t be surprising; after all, Chapter 12 showed that raster and draw was about 62ms for simple pages, and render was 23ms.
Even with just 62ms per frame, our browser is barely doing 15 frames per second; for smooth animations we want 30! So we need to speed up raster and draw.
The best way to do that is to move raster and draw to the GPU. A GPU is essentially a chip in your computer that runs programs much like your CPU, but specialized toward running very simple programs with massive parallelism—it was developed to apply simple operations, in parallel, for every pixel on the screen. This makes GPUs faster for drawing simple shapes and much faster for applying visual effects.
At a high level, to raster and draw on the GPU our browser must:These steps vary a bit in their details by GPU architecture.
Upload the display list to specialized GPU memory.
Compile GPU programs that raster and draw the display list.That’s right, GPU programs are dynamically compiled! This allows them to be portable across a wide variety of implementations that may have very different instruction sets or acceleration tactics. These compiled programs will typically be cached, so this step won’t occur on every animation frame.
Luckily, SDL and Skia support GPUs and all of these steps; it’s mostly a matter of passing them the right parameters to cause them to happen on the GPU. So let’s do that. Note that a real browser typically implements both CPU and GPU raster and draw, because in some cases CPU raster and draw can be faster than using the GPU, or it may be necessary to work around bugs.Any of the four steps can make GPU raster and draw slow. Large display lists take a while to upload. Complex display list commands take longer to compile. Raster can be slow if there are many surfaces, and draw can be slow if surfaces are deeply nested. On a CPU, the upload step and compile steps aren’t necessary, and more memory is available for raster and draw. Of course, many optimizations are available for both GPUs and CPUs, so choosing the best way to raster and draw a given page can be quite complex. In our browser, for simplicity, we’ll always use the GPU.
First, we’ll need to install the OpenGL library:
pip3 install PyOpenGLand import it:
import OpenGL.GLNow we’ll need to configure SDL to use OpenGL and start/stop a GL context at the beginning/end of the program. For our purposes, just consider this API boilerplate:Starting a GL context is just OpenGL’s way of saying “set up the surface into which subsequent OpenGL commands will draw”. After creating one you can even execute OpenGL commands manually, without using Skia at all, to draw polygons or other objects on the screen.
class Browser:
    def __init__(self):
        # ...
        self.sdl_window = sdl2.SDL_CreateWindow(b"Browser",
            sdl2.SDL_WINDOWPOS_CENTERED,
            sdl2.SDL_WINDOWPOS_CENTERED,
            WIDTH, HEIGHT,
            sdl2.SDL_WINDOW_SHOWN | sdl2.SDL_WINDOW_OPENGL)
        self.gl_context = sdl2.SDL_GL_CreateContext(
            self.sdl_window)
        print(("OpenGL initialized: vendor={}," + \
            "renderer={}").format(
            OpenGL.GL.glGetString(OpenGL.GL.GL_VENDOR),
            OpenGL.GL.glGetString(OpenGL.GL.GL_RENDERER)))

    def handle_quit(self):
        # ...
        sdl2.SDL_GL_DeleteContext(self.gl_context)
        sdl2.SDL_DestroyWindow(self.sdl_window)
That print statement shows the GPU vendor and renderer
that the browser is using; this will help you verify that it’s actually
using your GPU. I’m using a Chromebook to write this chapter, so for me
it says:The
virgl renderer stands for “virtual GL”, a way of
hardware-accelerating the Linux subsystem of ChromeOS that works with
the ChromeOS Linux sandbox. This is a bit slower than using the GPU
directly, so you’ll probably see even faster raster and draw than I
do.
OpenGL initialized: vendor=b'Red Hat', renderer=b'virgl'Now we can configure Skia to draw directly to the screen. The
incantation is:Weirdly,
this code draws to the window without referencing
gl_context or sdl_window directly. That’s
because OpenGL is a strange API with a lot of hidden global state; the
MakeGL Skia method implicitly binds to the existing GL
context.
class Browser:
    def __init__(self):
        # ...
        self.skia_context = skia.GrDirectContext.MakeGL()

        self.root_surface = \
            skia.Surface.MakeFromBackendRenderTarget(
            self.skia_context,
            skia.GrBackendRenderTarget(
                WIDTH, HEIGHT, 0, 0,
                skia.GrGLFramebufferInfo(
                    0, OpenGL.GL.GL_RGBA8)),
                skia.kBottomLeft_GrSurfaceOrigin,
                skia.kRGBA_8888_ColorType,
                skia.ColorSpace.MakeSRGB())
        assert self.root_surface is not None
An extra advantage of using OpenGL is that we won’t need to copy data
between Skia and SDL anymore. Instead we just flush the Skia
surface (Skia surfaces draw lazily) and call
SDL_GL_SwapWindow to activate the new framebuffer (because
of OpenGL double-buffering):
class Browser:
    def draw(self):
        # ...
        self.root_surface.flushAndSubmit()
        sdl2.SDL_GL_SwapWindow(self.sdl_window)
Finally, our browser also creates Skia surfaces for the
chrome_surface and tab_surface. We don’t want
to draw these straight to the screen, so the incantation is a bit
different:
class Browser:
    def __init__(self):
        # ...
        self.chrome_surface = skia.Surface.MakeRenderTarget(
                self.skia_context, skia.Budgeted.kNo,
                skia.ImageInfo.MakeN32Premul(
                    WIDTH, math.ceil(self.chrome.bottom)))
        assert self.chrome_surface is not None
Again, you should think of these changes mostly as boilerplate, since
the details of GPU operation aren’t our focus here.Example detail: a different
color space is required for GPU mode. Make sure to apply
the same treatment to tab_surface (with different width and
height arguments).
Thanks to the thorough support for GPU rendering in SDL and Skia, that should be all that’s necessary for our browser to raster and draw on the GPU. And as expected, speed is much improved. I found that raster and draw improved to 7 ms on average (see Figure 1).
That’s about 10 times faster, and enough to hit 30 frames per second. (And on your computer, you’ll likely see even more speedup than I did, so for you it might already be fast enough in this example.) But if we want to go faster yet, we’ll need to find ways to reduce the total amount of work in rendering, raster and draw.
A high-speed, reliable and cross-platform GPU raster path in Skia has only existed for a few years.You can see a timeline on the Chrome developer blog. In the very early days of Chromium, there was only CPU raster. Scrolling was implemented much like in the early chapters of this book, by re-rastering content. This was deemed acceptable at the time because computers were much slower than today in general, GPUs much less reliable, animations less frequent, and mobile platforms such as Android and iOS still emerging. (In fact, the first versions of Android also didn’t have GPU acceleration.) The same is generally true of Firefox and Safari, though Safari was able to accelerate content more easily because it only targeted the limited number of GPUs supported by macOS and iOS.
There are many challenges to implementing GPU-accelerated raster, among them working correctly across many GPU architectures, gracefully falling back to CPU raster in complex or error scenarios, and finding ways to efficiently GPU-raster content in difficult situations like anti-aliased and complex shapes. So while you might think it’s odd to wait until now to turn on GPU acceleration in our browser, this also mirrors the evolution timeline of browsers.
So, how do we do less work in the raster-and-draw phase? The answer is a technique called compositing, which just means caching some rastered images on the GPU and reusing them during later frames.The term compositing means combining multiple images together into a final output. In the context of browsers, it typically means combining rastered images into the final on-screen image, but a similar technique is used in many operating systems to combine the contents of multiple windows. “Compositing” can also refer to multithreaded rendering. I first discussed compositing in Chapter 11; the algorithms described here generalize that beyond scrolling.
To explain compositing, we’ll need to think about our browser’s
display list, and to do that it’s useful to print it out. For example,
for DrawRect you might print:
class DrawRect:
    def __repr__(self):
        return ("DrawRect(top={} left={} " +
            "bottom={} right={} color={})").format(
            self.top, self.left, self.bottom,
            self.right, self.color)
The Blend command sometimes does nothing if no opacity
or blend mode is passed; it’s helpful to indicate that when
printing:
class Blend:
    def __repr__(self):
        args = ""
        if self.opacity < 1:
            args += ", opacity={}".format(self.opacity)
        if self.blend_mode:
            args += ", blend_mode={}".format(self.blend_mode)
        if not args:
            args = ", <no-op>"
        return "Blend({})".format(args[2:])
You’ll also need to add children fields to all of the
paint commands, since print_tree relies on those. Now we
can print out our browser’s display list:
class Tab:
    def render(self):
        # ...
        for item in self.display_list:
            print_tree(item)
For our opacity example, the (key part of) the display list for one frame might look like this:
Blend(alpha=0.119866666667)
  DrawText(text=This)
  DrawText(text=text)
  DrawText(text=fades)
On the next frame, it instead might like this:
Blend(alpha=0.112375)
  DrawText(text=This)
  DrawText(text=text)
  DrawText(text=fades)
In each case, rastering this display list means first rastering the
three words to a Skia surface created by Blend, and then
copying that to the root surface while applying transparency. Crucially,
the raster is identical in both frames; only the copy differs. This
means we can speed it up with caching.
The idea is to first raster the three words to a separate surface (but this time owned by us, not Skia), which we’ll call a composited layer, that is saved for future use:
Composited Layer:
  DrawText(text=This)
  DrawText(text=text)
  DrawText(text=fades)
Now instead of rastering those three words, we can just copy over the
composited layer with a DrawCompositedLayer command:
Blend(alpha=0.112375)
  DrawCompositedLayer()
Importantly, on the next frame, the Blend changes but
the DrawTexts don’t, so on that frame all we need to do is
re-run the Blend:
Blend(alpha=0.119866666667)
  DrawCompositedLayer()
In other words, the idea behind compositing is to split the display list into two pieces: a set of composited layers, which are rastered during the browser’s raster phase and then cached, and a draw display list, which is drawn during the browser’s draw phase and which uses the composited layers.
Compositing improves performance when subsequent frames of an
animation reuse composited layers. That’s the case here, because the
only difference between frames is the Blend, which is in
the draw display list.
How exactly to split up the display list is up to the browser.
Typically, visual effects like opacity are very fast to execute on a
GPU, but paint commands that draw shapes—in our browser,
DrawText, DrawRect, DrawRRect,
and DrawLine—can be slower.And there are usually a lot
more of them to execute. Since it’s the visual effects
that are typically animated, this means browsers usually leave animated
visual effects in the draw display list and move everything else into
composited layers. Of course, in a real browser, hardware capabilities,
GPU memory, and application data all play into these decisions, but the
basic idea of compositing is the same no matter what goes where.
If you look closely at the opacity example in this section, you’ll
see that the DrawText command’s rect is only
as wide as the text. On the other hand, the Blend
rect is almost as wide as the viewport. The reason they
differ is that the text is only about as wide as it needs to be, but the
block element that contains it is as wide as the available width.
So if we put it in a composited layer, does it need to be as wide as the text or the whole viewport? In practice you could implement either. The algorithm presented in this chapter ends up with the smaller one but real browsers sometimes choose the larger, depending on their algorithm. Also note that if there was any kind of paint command associated with the block element containing the text, such as a background color, then the surface would definitely have to be as wide as the viewport. Likewise, if there were multiple inline children, the union of their bounds would contribute to the surface size.
Let’s implementing compositing. We’ll need to identify paint commands and move them to composited layers. Then we’ll need to create the draw display list that combines these composited layers with visual effects. To keep things simple, we’ll start by creating a composited layer for every paint command.
To identify paint commands, it’ll be helpful to give them all a
PaintCommand superclass:
class PaintCommand:
    def __init__(self, rect):
        self.rect = rect
        self.children = []
Now each paint command needs to be a subclass of
PaintCommand; to do that, you need to name the superclass
when the class is declared and also use some special syntax in the
constructor:
class DrawLine(PaintCommand):
    def __init__(self, x1, y1, x2, y2, color, thickness):
        super().__init__(skia.Rect.MakeLTRB(x1, y1, x2, y2))
        # ...
MakeLTRB creates the rect for the
PaintCommand constructor. We can also give a superclass to
visual effects:
class VisualEffect:
    def __init__(self, rect, children):
        self.rect = rect.makeOffset(0.0, 0.0)
        self.children = children
        for child in self.children:
            self.rect.join(child.rect)
Note that since visual effects have children, we need to not only
pass those to the constructor, but also add their rect
fields to our own. I use the makeOffset function to make a
copy of the original rect, which is then grown by later
join methods to include all of the children as well.
Go ahead and modify each paint command and visual effect class to be
a subclass of one of these two new classes. Make sure you declare the
superclass on the class line and also call the superclass
constructor in the __init__ method using the
super() syntax.
We can now list all of the paint commands using
tree_to_list:
class Browser:
    def composite(self):
        all_commands = []
        for cmd in self.active_tab_display_list:
            all_commands = tree_to_list(cmd, all_commands)
        paint_commands = [cmd for cmd in all_commands
            if isinstance(cmd, PaintCommand)]
Next we need to group paint commands into layers. For now, let’s do
the simplest possible thing and put each paint command into its own
CompositedLayer:
class Browser:
    def __init__(self):
        # ...
        self.composited_layers = []

    def composite(self):
        self.composited_layers = []
        # ...
        for cmd in paint_commands:
            layer = CompositedLayer(self.skia_context, cmd)
            self.composited_layers.append(layer)
Here, a CompositedLayer just stores a list of
display items (and a surface that they’ll be drawn to).For now, it’s just one display
item, but that will change pretty soon.
class CompositedLayer:
    def __init__(self, skia_context, display_item):
        self.skia_context = skia_context
        self.surface = None
        self.display_items = [display_item]
Now we need a draw display list that combines the composited layers.
To build this we’ll walk up from each composited layer and build a chain
of all of the visual effects applied to it, with a
DrawCompositedLayer at the bottom of the chain.
First, to make it easy to access those ancestor visual effects and compare them, let’s add parent pointers to our display list tree:
def add_parent_pointers(nodes, parent=None):
    for node in nodes:
        node.parent = parent
        add_parent_pointers(node.children, node)

class Browser:
    def composite(self):
        add_parent_pointers(self.active_tab_display_list)
        # ...
Next, we’ll need to clone each of the ancestors of the
layer’s paint commands and inject new children, so let’s add a new
clone method to the visual effects classes. For
Blend, it’ll create a new Blend with the same
parameters but new children:
class Blend(VisualEffect):
    # ...
    def clone(self, child):
        return Blend(self.opacity, self.blend_mode,
                     self.node, [child])
Our browser won’t be cloning paint commands, since they’re all going
to be inside a composited layer, so we don’t need to implement
clone for them.
We can now build the draw display list. For each composited layer,
create a DrawCompositedLayer command (which we’ll define in
just a moment). Then, walk up the display list, wrapping that
DrawCompositedLayer in each visual effect that applies to
that composited layer:
class Browser:
    def __init__(self):
        # ...
        self.draw_list = []

    def paint_draw_list(self):
        self.draw_list = []
        for composited_layer in self.composited_layers:
            current_effect = \
                DrawCompositedLayer(composited_layer)
            if not composited_layer.display_items: continue
            parent = composited_layer.display_items[0].parent
            while parent:
                current_effect = \
                    parent.clone(current_effect)
                parent = parent.parent
            self.draw_list.append(current_effect)
The code in paint_draw_list just walks up from each
composited layer, recreating all of the effects applied to it. This will
work—mostly—but if one effect applies to more than one composited layer,
it’ll turn into multiple identical effects, applied separately to each
composited layer. That’s not right, because as we discussed in Chapter 11, the order of operations
matters.
Let’s fix that by reusing cloned effects:
class Browser:
    def paint_draw_list(self):
        new_effects = {}
        self.draw_list = []
        for composited_layer in self.composited_layers:
            # ...
            while parent:
                if parent in new_effects:
                    new_parent = new_effects[parent]
                    new_parent.children.append(current_effect)
                    break
                else:
                    current_effect = \
                        parent.clone(current_effect)
                    new_effects[parent] = current_effect
                    parent = parent.parent
            if not parent:
                self.draw_list.append(current_effect)
That’s it! Now that we’ve split the display list into composited layers and a draw display list, we need to update the rest of the browser to use them for raster and draw.
Let’s start with raster. In the raster step, the browser needs to walk the list of composited layers and raster each:
class Browser:
    def raster_tab(self):
        for composited_layer in self.composited_layers:
            composited_layer.raster()
Inside raster, the composited layer needs to allocate a
surface to raster itself into; this requires knowing how big it is.
That’s just the union of the bounding boxes of all of its paint
commands—the rect field:
class CompositedLayer:
    # ...
    def composited_bounds(self):
        rect = skia.Rect.MakeEmpty()
        for item in self.display_items:
            rect.join(item.rect)
        # ...
We’ll create a surface just big enough to store the items in this composited layer; this reduces how much GPU memory we need. That being said, there are some tricky corner cases to consider, such as how Skia rasters lines or anti-aliased text across multiple pixels in order to look nice or align with the pixel grid.One pixel of “slop” around the edges is not good enough for a real browser, which has to deal with lots of really subtle issues like nicely blending pixels between adjacent composited layers, subpixel positioning, and effects like blur filters with infinite theoretical extent. So let’s add in one extra pixel on each side to account for that:
    def composited_bounds(self):
        # ...
        rect.outset(1, 1)
        return rect
And now we can make the surface with those bounds:
class CompositedLayer:
    def raster(self):
        bounds = self.composited_bounds()
        if bounds.isEmpty(): return
        irect = bounds.roundOut()

        if not self.surface:
            self.surface = skia.Surface.MakeRenderTarget(
                self.skia_context, skia.Budgeted.kNo,
                skia.ImageInfo.MakeN32Premul(
                    irect.width(), irect.height()))
            assert self.surface
        canvas = self.surface.getCanvas()
To raster the composited layer, draw all of its display items to this
surface. The only tricky part is the need to offset by the
top and left of the composited bounds, since
the surface bounds don’t include that offset:
class CompositedLayer:
    def raster(self):
        # ...
        canvas.clear(skia.ColorTRANSPARENT)
        canvas.save()
        canvas.translate(-bounds.left(), -bounds.top())
        for item in self.display_items:
            item.execute(canvas)
        canvas.restore()
That’s all for the raster phase. For the draw phase, we’ll first need
to implement the DrawCompositedLayer command. It takes a
composited layer to draw:
class DrawCompositedLayer(PaintCommand):
    def __init__(self, composited_layer):
        self.composited_layer = composited_layer
        super().__init__(
            self.composited_layer.composited_bounds())

    def __repr__(self):
        return "DrawCompositedLayer()"
Executing a DrawCompositedLayer is straightforward—just
draw its surface into the parent surface, adjusting for the correct
offset:
class DrawCompositedLayer(PaintCommand):
    def execute(self, canvas):
        layer = self.composited_layer
        bounds = layer.composited_bounds()
        layer.surface.draw(canvas, bounds.left(), bounds.top())
Compared with raster, the browser’s draw phase is
satisfyingly simple: simply execute the draw display list.
class Browser:
    def draw(self):
        # ...
        canvas.save()
        canvas.translate(0,
            self.chrome.bottom - self.active_tab_scroll)
        for item in self.draw_list:
            item.execute(canvas)
        canvas.restore()
        # ...
All that’s left is wiring these methods up; let’s rename
raster_and_draw to composite_raster_and_draw
(to remind us that there’s now an additional composite step) and add our
two new methods. (And don’t forget to rename the corresponding dirty bit
and call sites.)
class Browser:
    def composite_raster_and_draw(self):
        # ...
        self.composite()
        self.raster_chrome()
        self.raster_tab()
        self.paint_draw_list()
        self.draw()
        # ...
So simple and elegant! Now, on every frame, we are simply splitting the display list into composited layers and the draw display list, and then running each of those in their own phase. We’re now half way toward getting super-smooth animations. What remains is skipping the layout and raster steps if the display list didn’t change much between frames.
The algorithm presented here is a simplified version of what Chromium actually implements. For more details and information on how Chromium implements these concepts see blog posts on the Chrome developer blog; other browsers do something broadly similar. Chromium’s implementation of the “visual effect nesting” data structure is called property trees. The name is plural because there is more than one tree, due to the complex containing block structure of scrolling and clipping.
The key to not re-rastering layers is to know which layers have changed, and which haven’t. Right now, we’re basically always assuming all layers have changed, but ideally we’d know exactly what’s changed between frames. Browsers have all sorts of complex methods to achieve this,Chromium, for example, tries to diff the old and new styles any time a style changes on the page. But this is tricky, because a change in style on one element could be inherited by a different element, so diffing will always be somewhat brittle and incomplete. but to keep things simple, let’s implement a CSS feature that’s perfect for compositing: CSS transitions.
CSS transitions take the requestAnimationFrame loop we
used to implement animations and move it “into the browser”. The web
page just needs to add a CSS transition
property, which defines properties to animate and how long to animate
them for. Here’s how to say opacity changes to a div should
animate for two seconds:
div { transition: opacity 2s; }Now, whenever the opacity property of a div
changes for any reason—like from changing its style attribute—the
browser smoothly interpolates between the old and new values for two
seconds. Here is an
example.
(click here to load the example in your browser)
Visually, it looks more or less identicalIt’s not exactly the same,
because our JavaScript code uses a linear interpolation (or easing
function) between the old and new values. Real browsers use a
non-linear default easing function for CSS transitions because it looks
better. We’ll implement a linear easing function for our browser, so it
will look identical to the JavaScript and subtly different from real
browsers, but you can try adding it via Exercise 13-2. to
the JavaScript animation. But since the browser understands the
animation, it can optimize how the animation is run. For example, since
opacity only affects Blend commands that end
up in the draw display list, the browser knows that this animation does
not require layout or raster, just paint and draw.
To implement CSS transitions, we’ll need to represent animation
state—like the JavaScript variables current_frame and
change_per_frame from the earlier example—in the browser.
Since multiple elements can animate at a time, let’s store an
animations dictionary on each node, keyed by the property
being animated:For
simplicity, this code leaves animations in the animations
dictionary even when they’re done animating. Removing them would be
necessary, however, for really long-running tabs where just looping over
all the already-completed animations can take a while.
class Text:
    def __init__(self, text, parent):
        # ...
        self.style = {}
        self.animations = {}

class Element:
    def __init__(self, tag, attributes, parent):
        # ...
        self.style = {}
        self.animations = {}
The simplest type of thing to animate is numeric properties like
opacity:
class NumericAnimation:
    def __init__(self, old_value, new_value, num_frames):
        self.old_value = float(old_value)
        self.new_value = float(new_value)
        self.num_frames = num_frames

        self.frame_count = 1
        total_change = self.new_value - self.old_value
        self.change_per_frame = total_change / num_frames
Much like in JavaScript, we’ll need an animate method
that increments the frame count, computes the new value and returns
it:
class NumericAnimation:
    def animate(self):
        self.frame_count += 1
        if self.frame_count >= self.num_frames: return
        current_value = self.old_value + \
            self.change_per_frame * self.frame_count
        return str(current_value)
We’ll create these animation objects every time a style value
changes, which we can detect in style by diffing the old
and new styles of each node:
def style(node, rules):
    old_style = node.style

    # ...

    if old_style:
        transitions = diff_styles(old_style, node.style)
This diff_styles function is going to look for all
properties that are mentioned in the transition property
and are different between the old and the new style. So first, we’re
going to have to parse the transition value.
The first challenge is, annoyingly, that at the moment our CSS parser
doesn’t recognize opacity 2s as a valid CSS value, since it
parses values as a single word. Let’s upgrade the parser to recognize
any string of characters except one of a specified set of
chars:
class CSSParser:
    def until_chars(self, chars):
        start = self.i
        while self.i < len(self.s) and self.s[self.i] not in chars:
            self.i += 1
        return self.s[start:self.i]

    def pair(self, until):
        # ...
        val = self.until_chars(until)
        # ...
        return prop.casefold(), val.strip()
Inside a CSS rule body, a property value continues until a semicolon or a close curly brace:
class CSSParser:
    def body(self):
        while self.i < len(self.s) and self.s[self.i] != "}":
            try:
                prop, val = self.pair([";", "}"])
                # ...
Now that we parse the CSS property, we can parse out the properties with transitions:Note that this returns a dictionary mapping property names to transition durations, measured in frames.
def parse_transition(value):
    properties = {}
    if not value: return properties
    for item in value.split(","):
        property, duration = item.split(" ", 1)
        frames = int(float(duration[:-1]) / REFRESH_RATE_SEC)
        properties[property] = frames
    return properties
Now diff_style can loop through all of the properties
mentioned in transition and see which ones changed. It
returns a dictionary containing only the transitioning properties, and
mapping each such property to its old value, new value, and duration
(again in frames).Note
also that this code has to deal with subtleties like the
transition property being added or removed, or properties
being removed instead of changing values.
def diff_styles(old_style, new_style):
    transitions = {}
    for property, num_frames in \
        parse_transition(new_style.get("transition")).items():
        if property not in old_style: continue
        if property not in new_style: continue
        old_value = old_style[property]
        new_value = new_style[property]
        if old_value == new_value: continue
        transitions[property] = \
            (old_value, new_value, num_frames)
    return transitions
Back inside style, we’re going to want to create a new
animation object for each transitioning property—we’ll support only
opacity.
def style(node, rules, tab):
    if old_style:
        transitions = diff_styles(old_style, node.style)
        for property, (old_value, new_value, num_frames) \
            in transitions.items():
            if property == "opacity":
                tab.set_needs_render()
                animation = NumericAnimation(
                    old_value, new_value, num_frames)
                node.animations[property] = animation
                node.style[property] = animation.animate()
Any time a property listed in a transition changes its
value, we create an animation and get ready to run it.Note that we need to call
set_needs_render here to make sure that the animation will
run on the next frame.
Running the animation entails iterating through all the active
animations on the page and calling animate on them. Since
CSS transitions are similar to requestAnimationFrame
animations, let’s run animations right after handling
requestAnimationFrame callbacks:
class Tab:
def run_animation_frame(self, scroll):
# ...
self.js.interp.evaljs("__runRAFHandlers()")
for node in tree_to_list(self.nodes, []):
for (property_name, animation) in \
node.animations.items():
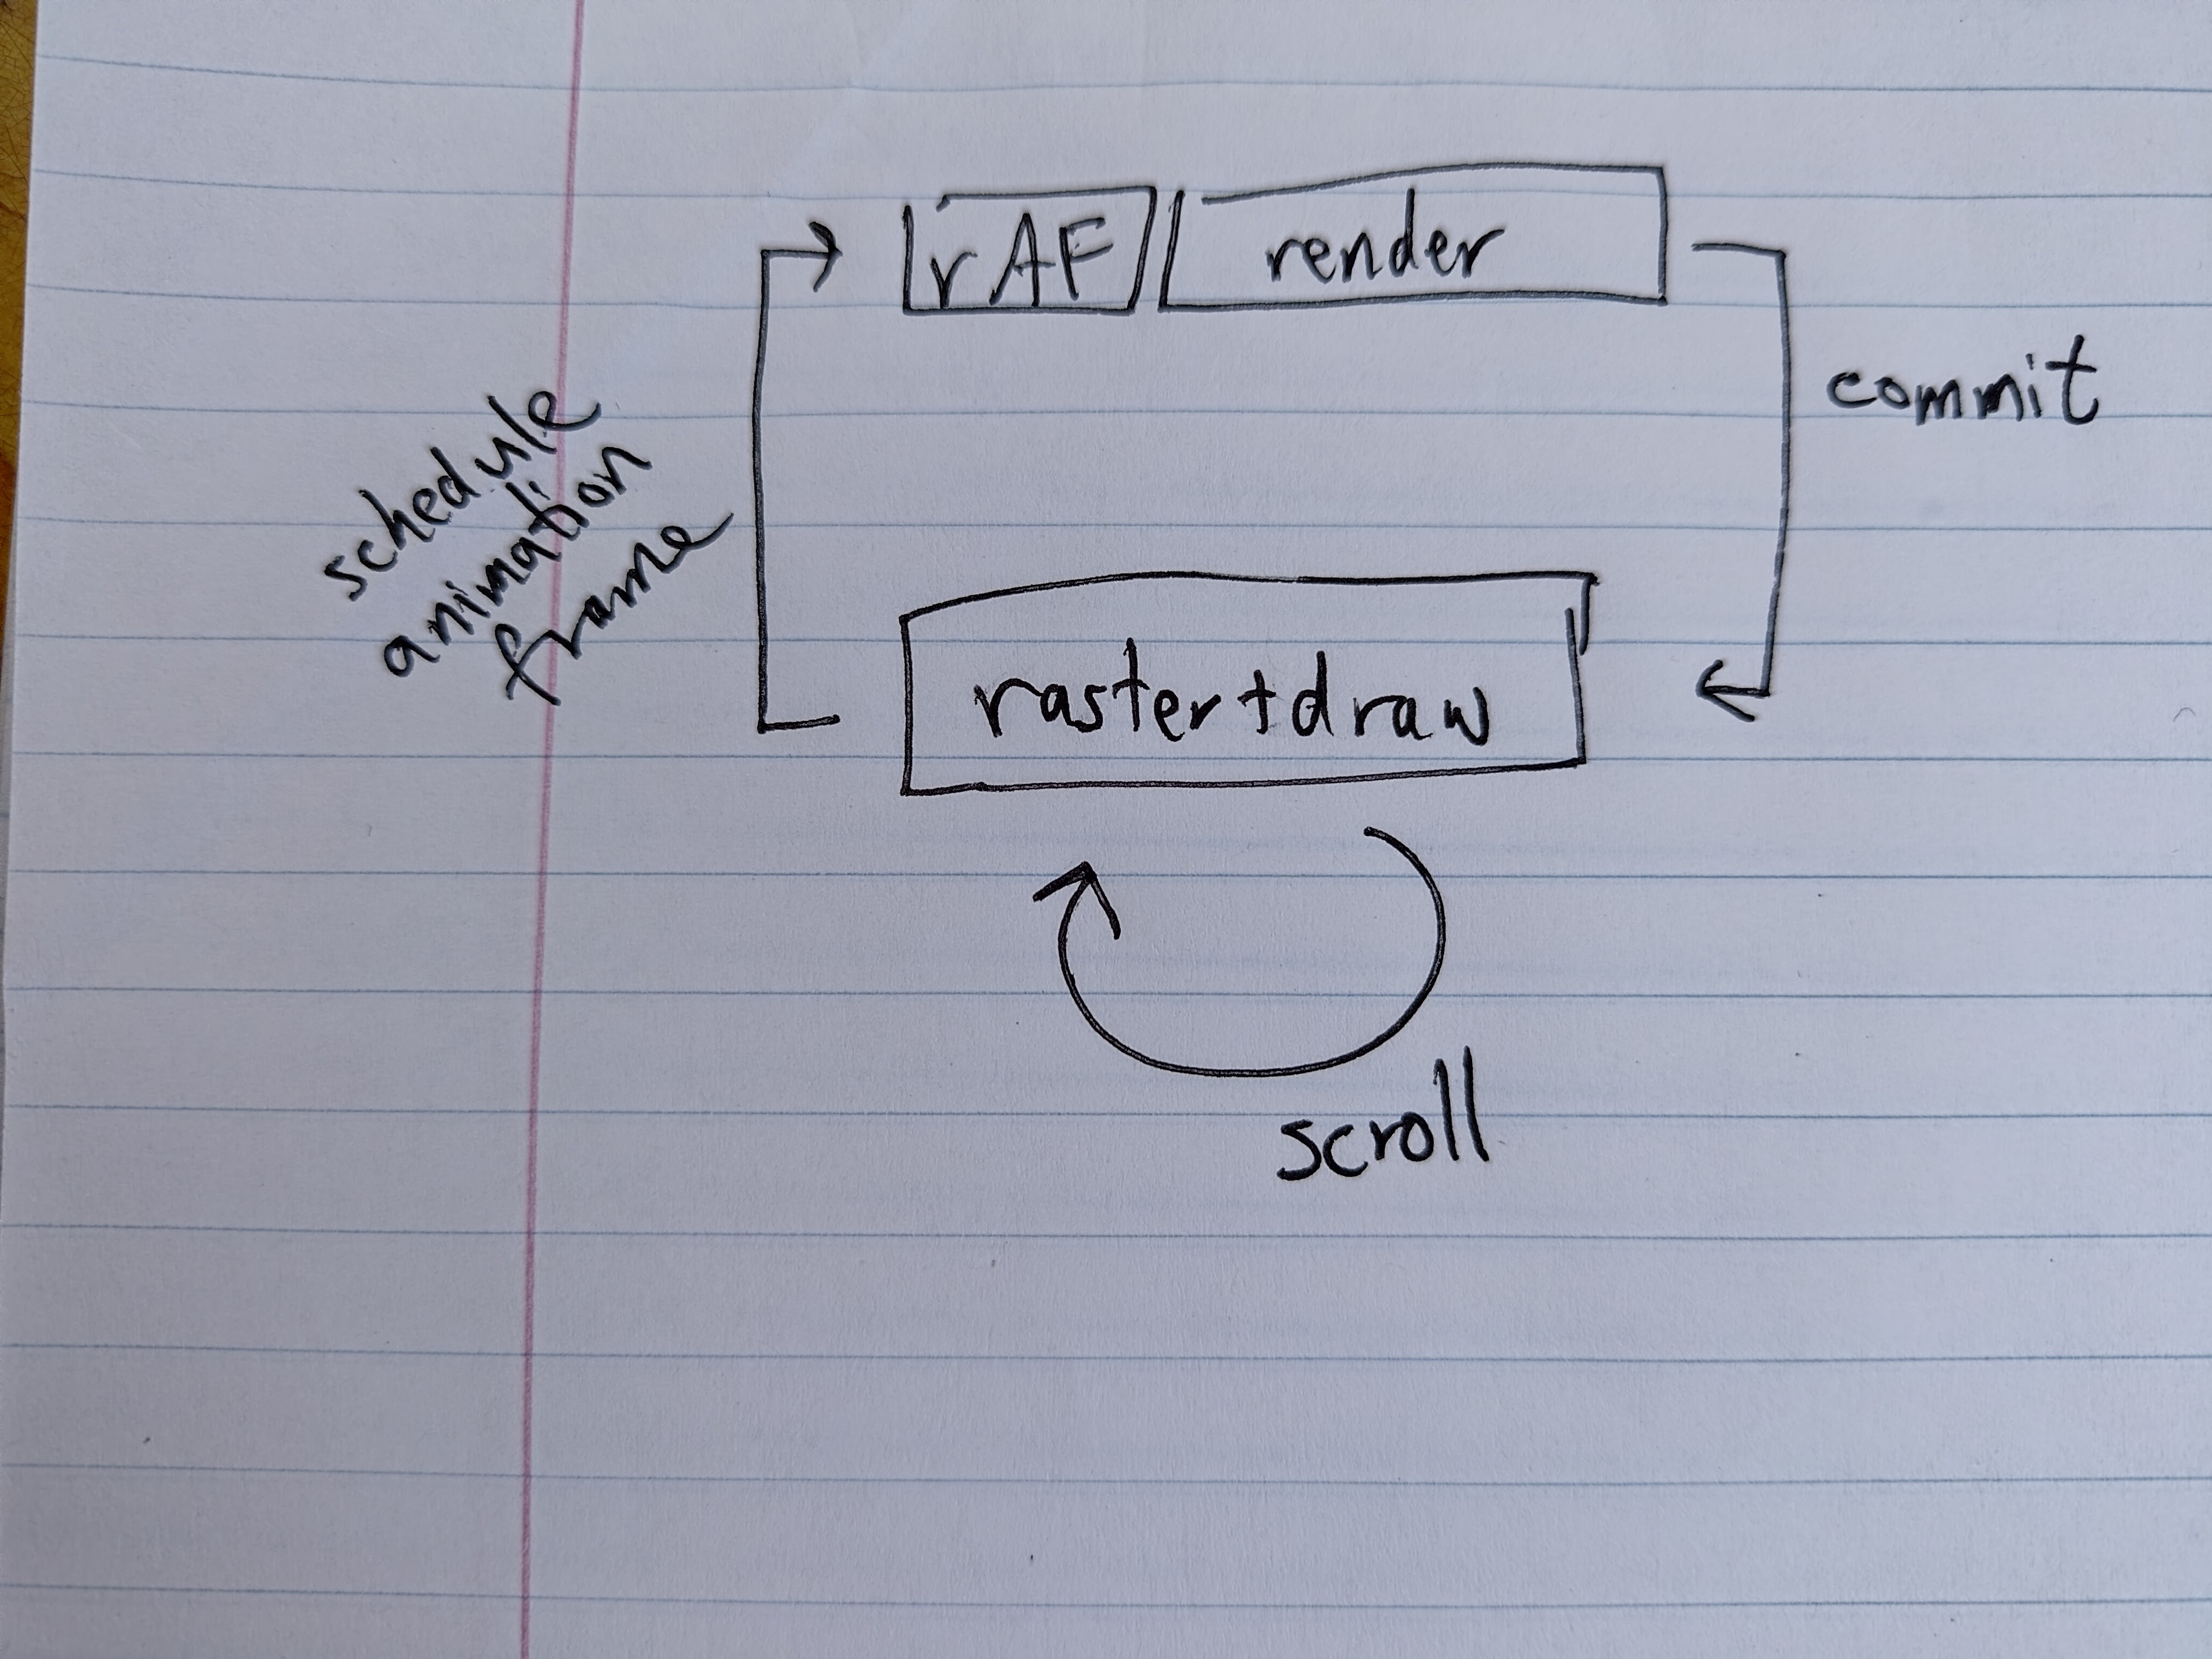
# ...Inside this loop we need to do two things. First, call the
animation’s animate method and save the new value to the
node’s style. Second, since that changes rendering inputs,
set a dirty bit requiring rendering later.We also need to schedule an
animation frame for the next frame of the animation, but
set_needs_render already does that for us.
The whole rendering cycle between the browser and main threads is
summarized in Figure 2.
However, it’s not as simple as just setting needs_render
any time an animation is active. Setting needs_render means
re-running style, which would notice that the animation
changed a property value and start a new animation! During an
animation, we want to run layout and paint,
but we don’t want to run style:While a real browser
definitely has an analog of the needs_layout and
needs_paint flags, our fix for restarting animations
doesn’t handle a bunch of edge cases. For example, if a different style
property than the one being animated changes, the browser shouldn’t
restart the animation. Real browsers do things like storing multiple
copies of the style—the computed style and the animated style—to solve
issues like this.
class Tab:
    def run_animation_frame(self, scroll):
        for node in tree_to_list(self.nodes, []):
            for (property_name, animation) in \
                node.animations.items():
                value = animation.animate()
                if value:
                    node.style[property_name] = value
                    self.set_needs_layout()
To implement set_needs_layout, we’ve got to replace the
single needs_render flag with three flags:
needs_style, needs_layout, and
needs_paint. In our implementation, setting a dirty bit
earlier in the pipeline will end up causing everything after it to also
run,This is yet another
difference from real browsers, which optimize some cases that just
require style and paint, or other combinations. so
set_needs_render still just sets the
needs_style flag:
class Tab:
    def __init__(self, browser, tab_height):
        # ...
        self.needs_style = False
        self.needs_layout = False
        self.needs_paint = False
        # ...

    def set_needs_render(self):
        self.needs_style = True
        self.browser.set_needs_animation_frame(self)
Now we can write a set_needs_layout method that sets
flags for the layout and paint phases, but not
the style phase:
class Tab:
    def set_needs_layout(self):
        self.needs_layout = True
        self.browser.set_needs_animation_frame(self)
To support these new dirty bits, render must check each
phase’s bit instead of checking needs_render at the
start:By the way, this
does obsolete our tracing code for how long rendering takes.
Rendering now does different work on different frames, so measuring
rendering overall doesn’t really make sense! I’m going to leave this be
and just not look at the rendering measures anymore, but the best fix
would be to have three trace events for the three phases of
render.
class Tab:
    def render(self):
        self.browser.measure.time('render')

        if self.needs_style:
            # ...
            self.needs_layout = True
            self.needs_style = False

        if self.needs_layout:
            # ...
            self.needs_paint = True
            self.needs_layout = False

        if self.needs_paint:
            # ...
            self.needs_paint = False

        self.browser.measure.stop('render')
Well—with all that done, our browser now supports animations with just CSS. And importantly, we can have the browser optimize opacity animations to avoid layout.
CSS transitions are great for adding animations triggered by DOM updates from JavaScript. But what about animations that are just part of a page’s UI, and not connected to a visual transition? (For example, a pulse opacity animation on a button or cursor.) This can be expressed directly in CSS without any JavaScript with a CSS animation.
You can see the CSS animation variant of the opacity demo here.
Implementing this feature requires parsing a new
@keyframes syntax and the animation CSS
property. Notice how @keyframes defines the start and end
point declaratively, which allows us to make the animation alternate
infinitely because a reverse is just going backward among the keyframes.
There is also the Web
Animations API, which allows creation and management of animations
via JavaScript.
We’re finally ready to teach the browser how to avoid raster (and
layout) when running certain animations. These are called composited
animations, since they are compatible with the compositing
optimization to avoid raster on every frame. Avoiding
raster and composite for opacity animations is
simple in concept: keep track of what is animating, and re-run only
paint, paint_draw_list and draw
on each frame.
Implementing this is harder than it sounds. We’ll need to split the
new display list into the old composited layers and a
new draw display list. To do this we’ll need to know how the
new and old display lists are related, and what parts of the display
list changed. For this purpose we’ll add a node field to
each display item, storing the node that painted it, as a sort of
identifier:Note that the
browser thread can never access that node, since it is owned by
another thread. But it can use the node as an
identifier.
class VisualEffect:
    def __init__(self, rect, children, node=None):
        # ...
        self.node = node
Now, when an animation runs—but nothing else changes—we’ll use these nodes to determine which display items in the draw display list we need to update.
First, when a composited animation runs, save the
Element whose style was changed in a new array called
composited_updates. We’ll also only set the
needs_paint flag, not needs_layout, in this
case:
class Tab:
    def __init__(self, browser):
        # ...
        self.composited_updates = []

    def run_animation_frame(self, scroll):
        for node in tree_to_list(self.nodes, []):
            for (property_name, animation) in \
                node.animations.items():
                value = animation.animate()
                if value:
                    node.style[property_name] = value
                    self.composited_updates.append(node)
                    self.set_needs_paint()
Now, when we commit a frame which only needs the paint
phase, send the composited_updates over to the browser,
which will use that to skip composite and raster. The data to be sent
across for each animation update will be an Element and a
Blend.
To accomplish this we’ll need several steps. First, when painting a
Blend, record it on the Element:
def paint_visual_effects(node, cmds, rect):
    # ...
    blend_op = Blend(opacity, blend_mode, cmds)
    node.blend_op = blend_op
    return [blend_op]
Next, add a list of composited updates to CommitData
(each of which will contain the Element and
Blend pointers).
class CommitData:
    def __init__(self, url, scroll, height,
        display_list, composited_updates):
        # ...
        self.composited_updates = composited_updates
And finally, commit the new information.Note the distinction between
None and {} for
composited_updates. None means that the
compositing step is needed, whereas {} means that it is
not—the dictionary just happens to be empty, because there aren’t any
composited animations running. A good example of the latter is changes
to scroll, which don’t affect compositing, yet are not
animated.
class Tab:
    def run_animation_frame(self, scroll):
        # ...
        needs_composite = self.needs_style or self.needs_layout

        self.render()

        composited_updates = None
        if not needs_composite:
            composited_updates = {}
            for node in self.composited_updates:
                composited_updates[node] = node.blend_op
        self.composited_updates = []

        commit_data = CommitData(
            # ...
            composited_updates,
        )
Now for the browser thread. First, add needs_composite,
needs_raster and needs_draw dirty bits and
corresponding set_needs_composite,
set_needs_raster, and set_needs_draw methods
(and remove the old dirty bit):
class Browser:
    def __init__(self):
        # ...
        self.needs_composite = False
        self.needs_raster = False
        self.needs_draw = False

    def set_needs_raster(self):
        self.needs_raster = True
        self.needs_draw = True

    def set_needs_composite(self):
        self.needs_composite = True
        self.needs_raster = True
        self.needs_draw = True

    def composite_raster_and_draw(self):
        if not self.needs_composite and \
            not self.needs_raster and \
            not self.needs_draw:
            self.lock.release()
            return

        if self.needs_composite:
            self.composite()
        if self.needs_raster:
            self.raster_chrome()
            self.raster_tab()
        if self.needs_draw:
            self.draw()
Then, where we currently call set_needs_raster_and_draw,
such as handle_down, we need to call
set_needs_raster:
class Browser:
    def handle_down(self):
        # ...
        self.set_needs_raster()
Use the data passed in commit to decide whether to call
set_needs_composite or set_needs_draw, and
store off the updates in composited_updates:
class Browser:
    def __init__(self):
        # ...
        self.composited_updates = {}

    def commit(self, tab, data):
        # ...
        if tab == self.active_tab:
            # ...
            self.composited_updates = data.composited_updates
            if self.composited_updates == None:
                self.composited_updates = {}
                self.set_needs_composite()
            else:
                self.set_needs_draw()
Now let’s think about the draw step. Normally, we create the draw
display list from the composited layers. But that won’t quite work now,
because the composited layers come from the old display list.
If we just try re-running paint_draw_list, we’ll get the
old draw display list! We need to update draw_list to take
into account the new display list based on the
composited_updates.
To do so, define a method get_latest that gets an
updated visual effect from composited_updates if there is
one:
class Browser:
    def get_latest(self, effect):
        node = effect.node
        if node not in self.composited_updates:
            return effect
        if not isinstance(effect, Blend):
            return effect
        return self.composited_updates[node]
Using get_latest in paint_draw_list is a
one-liner:
class Browser:
    def paint_draw_list(self):
        for composited_layer in self.composited_layers:
            while parent:
                new_parent = self.get_latest(parent)
                # ...
Update the rest of the while loop in
paint_draw_list to refer to new_parent instead
of parent when creating new effects (but not when walking
up from the composited layer).
Now the draw display list will be based on the new display list, and animations that only require the draw step, like our example opacity animation, will now run super smoothly.
One final note: the compositing data structures need to be cleared
when changing tabs. Let’s do that by factoring out a
clear_data method that clears everything in one go.
class Browser:
    def clear_data(self):
        self.active_tab_scroll = 0
        self.active_tab_url = None
        self.display_list = []
        self.composited_layers = []
        self.composited_updates = {}

    def set_active_tab(self, tab):
        # ...
        self.clear_data()
Figure 3 shows a screenshot of a rendered frame of an opacity
transition that only spends a bit more than a millisecond in each
composite_raster_and_draw call (source trace here):

This can be compared to the same with compositing disabled, shown in Figure 4, which spends about double that time (source here):And it would be much slower for a more complex example.

While visual effect animations in our browser are now efficient and composited, they are not threaded in the sense of Chapter 12: the animation still ticks on the main thread, and if there is some slow JavaScript or other task clogging the task queue, animations will stutter. This is a significant problem for real browsers, so almost all of them support threaded opacity, transform, and filter animations; some support certain kinds of clip animations as well. Adding threaded animations to our browser is left as Execise 13-3.
Nevertheless, it’s common to hear people use “composited” and “threaded” as synonyms. That’s because in most browsers, compositing is a prerequisite for threading. The reason is that if you’re going to animate efficiently, you usually need to composite a texture anyway, and plumbing animations on GPU textures is much easier to express in a browser than an animation on “part of a display list”.
That being said, it’s not impossible to animate display lists, and some browsers have attempted it. For example, one aim of the WebRender project at Mozilla is to get rid of cached composited layers entirely, and perform all animations by rastering and drawing at 60 Hz on the GPU directly from the display list. This is called a direct render approach. In practice this goal is hard to achieve with current GPU technology, because some GPUs are faster than others. So browsers are slowly evolving to a hybrid of direct rendering and compositing instead.
While all modern browsers have threaded animations, it’s interesting
to note that, as of the time of writing, Chromium and WebKit both
perform the compositing step on the main thread, whereas
our browser does it on the browser thread. In this area, our browser is
actually ahead of real browsers! The reason compositing doesn’t (yet)
happen on another thread in Chromium is that to get there took
re-architecting the entire algorithm for compositing. This turned out to
be extremely difficult, because the old architecture was deeply
intertwined with nearly every aspect of the rendering engine. It was
only completed
in 2021, so perhaps sometime soon this work will be threaded in
Chromium.
At this point, our browser successfully runs composited animations while avoiding needless layout and raster. But compared to a real browser, there are way too many composited layers—one per paint command! That is a big waste of GPU memory and time: each composited layer allocates a surface, and each of those allocates and holds on to GPU memory. GPU memory is limited, and we want to use less of it when possible.
To that end, we’d like to use fewer composited layers. The simplest thing we can do is put paint commands into the same composited layer if they have the exact same set of ancestor visual effects in the display list.
Let’s implement that. We’ll need two new methods on composited
layers: add and can_merge. The
add method just adds a new display item to a composited
layer:
class CompositedLayer:
    def add(self, display_item):
        self.display_items.append(display_item)
But we should only add compatible display items to the same
composited layer, determined by the can_merge method. A
display item be merged if it has the same parents as existing ones in
the composited layer:
class CompositedLayer:
    def can_merge(self, display_item):
        return display_item.parent == \
            self.display_items[0].parent
Now we want to use these methods in composite.
Basically, instead of making a new composited layer for every single
paint command, walk backwardBackward, because we can’t draw things in the wrong order.
Later items in the display list have to draw later.
through the composited_layers trying to find a composited
layer to merge the command into:If you’re not familiar with Python’s
for ... else syntax, the else block executes
only if the loop never executed break.
class Browser:
    def composite(self):
        for cmd in paint_commands:
            for layer in reversed(self.composited_layers):
                if layer.can_merge(cmd):
                    layer.add(cmd)
                    break
            else:
                # ...
With this implementation, multiple paint commands will sometimes end up in the same composited layer, but if the ancestor effects don’t exactly match, they won’t.
We can do even better by placing entire display list subtrees that aren’t animating into the same composited layer. This will let us put non-animating visual effects in the raster phase, reducing the number of composited layers even more.
To implement this, add a new needs_compositing field,
which is True when a visual effect should go in the draw
display list and False when it should go into a composited
layer. We’ll set it to False for most visual effects:
class VisualEffect:
    def __init__(self, rect, children):
        self.needs_compositing = False
We should set it to True when compositing would help us
animate something. There are all sorts of complex heuristics real
browsers use, but to keep things simple let’s just set it to
True for Blends (when they actually do
something, not for no-ops), regardless of whether they are
animating:
class Blend(VisualEffect):
    def __init__(self, opacity, blend_mode, node, children):
        # ...
        if self.should_save:
            self.needs_compositing = True
We’ll also need to mark a visual effect as needing compositing if any of its descendants do. That’s because if one effect is in the draw phase, then the ones above it will have to be as well:
class VisualEffect:
    def __init__(self, rect, children, node=None):
        # ...
        self.needs_compositing = any([
            child.needs_compositing for child in self.children
        ])
Now, instead of layers containing bare paint commands, they can contain subtrees of non-composited commands:
class Browser:
    def composite(self):
        # ...
        non_composited_commands = [cmd
            for cmd in all_commands
            if isinstance(cmd, PaintCommand) or \
                not cmd.needs_compositing
            if not cmd.parent or cmd.parent.needs_compositing
        ]
        # ...
        for cmd in non_composited_commands:
            # ...
The multiple if statements inside the list comprehension
are and-ed together.
Our compositing algorithm now creates way fewer layers! It does a good job of grouping together non-animating content to reduce the number of composited layers (which saves GPU memory), and doing as much non-animation work as possible in raster rather than draw (which makes composited animations faster).
At this point, the compositing algorithm and its effect on content is
getting pretty complicated. It will be very useful to you to add in more
visual debugging to help understand what is going on. One good way to do
this is to add a flagI also recommend you add a
mode to your browser that disables compositing (that is, setting
needs_compositing to False for every
VisualEffect), and disables use of the GPU (that is, going
back to the old way of making Skia surfaces). Everything should still
work (albeit more slowly) in all of the modes, and you can use these
additional modes to debug your browser more fully and benchmark its
performance. to our browser that draws a red border around
CompositedLayer content. This is a very simple addition to
CompositedLayer.raster:
class CompositedLayer:
    def raster(self):
        # ...
        if SHOW_COMPOSITED_LAYER_BORDERS:
            border_rect = skia.Rect.MakeXYWH(
                1, 1, irect.width() - 2, irect.height() - 2)
            DrawOutline(border_rect, "red", 1).execute(canvas)
The opacity transition example’s composited layers should look like Figure 5 (notice how there are two layers).

Mostly for simplicity, our browser composites Blend
visual effects regardless of whether they are animating. But in fact,
there are some good reasons to always composite certain visual
effects.
First, we’ll be able to start the animation quicker, since raster won’t have to happen first. That’s because whenever compositing reasons change, the browser has to redo compositing and re-raster the new surfaces.
Second, compositing sometimes has visual side-effects. Ideally, composited textures would look exactly the same on the screen as non-composited ones. But due to the details of pixel-sensitive raster technologies like sub-pixel rendering, image resize filter algorithms, blending and anti-aliasing, this isn’t always possible. For example, it’s common to observe subtle color differences in some pixels due to floating-point precision differences. “Pre-compositing” the content avoids visual jumps on the page when compositing starts.
Real browsers support the will-change
CSS property for the purpose of signaling pre-compositing.
The compositing algorithm we implemented works great in many cases. Unfortunately, it doesn’t work correctly for display list commands that overlap each other. Let me explain why with an example.
Consider a light blue square overlapped by a light green one, with a white background behind them, as in Figure 6.
Figure 6: Example of overlap that can lead to compositing draw errors.
Now suppose we want to animate opacity on the blue square, but not the green square. So the blue square goes in its own composited layer—but what about the green square? It has the same ancestor visual effects as the background. But we don’t want to put the green square in the same composited layer as the background, because the blue square has to be drawn in between the background and the green square.
Therefore, the green square has to go in its own composited layer. This is called an overlap reason for compositing, and is a major complication—and potential source of extra memory use and slowdown—faced by all real browsers.
Let’s modify our compositing algorithm to take overlap into account.
Basically, when considering which composited layer a display item goes
in, also check if it overlaps with an existing composited layer. If so,
start a new CompositedLayer for this display item:
class Browser:
    def composite(self):
        # ...
        for cmd in non_composited_commands:
            for layer in reversed(self.composited_layers):
                if layer.can_merge(cmd):
                    # ...
                elif skia.Rect.Intersects(
                    layer.composited_bounds(),
                    cmd.rect):
                    layer = CompositedLayer(self.skia_context, cmd)
                    self.composited_layers.append(layer)
                    break
It’s a bit hard to test this code, however, because our
browser doesn’t yet support any ways to move or growBy grow, I mean that the pixel
bounding rect of the visual effect when drawn to the screen is
larger than the pixel bounding rect of a paint command like
DrawText within it. After all, blending, compositing, and
opacity all change the colors of pixels, but don’t expand the set of
affected ones. And clips and masking decrease rather than increase the
set of pixels, so they can’t cause additional overlap either (though
they might cause less overlap). Certain CSS
filters, such as blurs, can also expand pixel rects.
an element as part of a visual effect, so nothing ever overlaps. Oops!
In real browsers there are lots of visual effects that cause overlap,
the most important (for animations) being transforms, which let
you move the painted output of a DOM subtree around the screen.Technically,
transform is not always just a visual effect. In real
browsers, transformed element positions contribute to scrolling
overflow. Real browsers mostly do this correctly, but sometimes cut
corners to avoid slowing down transform animations. Plus,
transforms can be executed efficiently on the GPU.
The transform CSS property is quite powerful, and lets
you apply any
linear transform in 3D space, but let’s stick to basic 2D
translations. That’s enough to implement something similar to the
example with the blue and green square:The green square has a
transform property also so that paint order doesn’t change
when you try the demo in a real browser. That’s because there are
various rules for painting, and “positioned” elements (such as elements
with a transform) are supposed to paint after regular
(non-positioned) elements. (This particular rule is mostly a historical
artifact.)
<div style="background-color:lightblue;
            transform:translate(50px, 50px)">Underneath</div>
<div style="background-color:lightgreen;
            transform:translate(0px, 0px)">On top</div>
Supporting these transforms is simple. First let’s parse the property values:The CSS transform syntax allows multiple transforms in a space-separated sequence; the end result involves applying each in sequence. I won’t implement that, just like I won’t implement many other parts of the standardized transform syntax.
def parse_transform(transform_str):
    if transform_str.find('translate(') < 0:
        return None
    left_paren = transform_str.find('(')
    right_paren = transform_str.find(')')
    (x_px, y_px) = \
        transform_str[left_paren + 1:right_paren].split(",")
    return (float(x_px[:-2]), float(y_px[:-2]))
Then, add some code to paint_visual_effects to add new
Transform visual effects:
def paint_visual_effects(node, cmds, rect):
    translation = parse_transform(
        node.style.get("transform", ""))
    # ...
    return [Transform(translation, rect, node, [blend_op])]
These Transform display items just call the conveniently
built-in Skia canvas translate method:
class Transform(VisualEffect):
    def __init__(self, translation, rect, node, children):
        super().__init__(rect, children, node)
        self.self_rect = rect
        self.translation = translation

    def execute(self, canvas):
        if self.translation:
            (x, y) = self.translation
            canvas.save()
            canvas.translate(x, y)
        for cmd in self.children:
            cmd.execute(canvas)
        if self.translation:
            canvas.restore()

    def clone(self, child):
        return Transform(self.translation, self.self_rect,
            self.node, [child])

    def __repr__(self):
        if self.translation:
            (x, y) = self.translation
            return "Transform(translate({}, {}))".format(x, y)
        else:
            return "Transform(<no-op>)"
We also need to fix the hit testing algorithm to take into account
translations in click. Instead of just comparing the
locations of layout objects with the click point, compute an
absolute bound—in coordinates of what the user sees, including
the translation offset—and compare against that. Let’s use two helper
methods that compute such bounds. The first maps a rect through a
translation, and the second walks up the node tree, mapping through each
translation found.
def map_translation(rect, translation):
    if not translation:
        return rect
    else:
        (x, y) = translation
        matrix = skia.Matrix()
        matrix.setTranslate(x, y)
        return matrix.mapRect(rect)

def absolute_bounds_for_obj(obj):
    rect = skia.Rect.MakeXYWH(
        obj.x, obj.y, obj.width, obj.height)
    cur = obj.node
    while cur:
        rect = map_translation(rect,
            parse_transform(
                cur.style.get("transform", "")))
        cur = cur.parent
    return rect
And then use it in click:
class Tab:
    # ...
    def click(self, x, y):
        # ...
        loc_rect = skia.Rect.MakeXYWH(x, y, 1, 1)
        objs = [obj for obj in tree_to_list(self.document, [])
                if absolute_bounds_for_obj(obj).intersects(
                    loc_rect)]
However, if you try to load the example above, you’ll find that it still looks wrong—the blue square is supposed to be under the green one, but it’s on top.Hit testing is correct, though, because the rendering problem is in compositing, not geometry of layout objects.
That’s because when we test for overlap, we’re comparing the
composited_bounds of the display item to the
composited_bounds of the composited layer. That means we’re
comparing the original location of the display item, not its shifted
version. We need to compute the absolute bounds instead:
class Browser:
    def composite(self):
        for cmd in non_composited_commands:
            for layer in reversed(self.composited_layers):
                if layer.can_merge(cmd):
                    # ...
                elif skia.Rect.Intersects(
                    layer.absolute_bounds(),
                    local_to_absolute(cmd, cmd.rect)):
                    # ...
The absolute_bounds method looks like this:
class CompositedLayer:
    def absolute_bounds(self):
        rect = skia.Rect.MakeEmpty()
        for item in self.display_items:
            rect.join(local_to_absolute(item, item.rect))
        return rect
To implement local_to_absolute, we first need a new
map method on Transform that takes a rect in
the coordinate space of the “contents” of the transform and outputs a
rect in post-transform space. For example, if the transform was
translate(20px, 0px) then the output of calling
map on a rect would translate it by 20 pixels in the
x direction.
class Transform(VisualEffect):
    def map(self, rect):
        return map_translation(rect, self.translation)
For Blend, it’s worth adding a special case for
clipping:
class Blend(VisualEffect):
    def map(self, rect):
        if self.children and \
           isinstance(self.children[-1], Blend) and \
           self.children[-1].blend_mode == "destination-in":
            bounds = rect.makeOffset(0.0, 0.0)
            bounds.intersect(self.children[-1].rect)
            return bounds
        else:
            return rect
Now we can compute the absolute bounds of a display item, mapping its
composited bounds through all of the visual effects applied to it. This
looks a lot like absolute_bounds_for_obj, except that it
works on the display list and not the layout object tree:
def local_to_absolute(display_item, rect):
    while display_item.parent:
        rect = display_item.parent.map(rect)
        display_item = display_item.parent
    return rect
The blue square should now be underneath the green square, so overlap testing is now complete. You should now be able to render this example correctly.
It should look like Figure 7.

Notice how this example exhibits two interesting features we had to get right when implementing compositing:


There’s one more situation worth thinking about, though. Suppose we
have a huge composited layer, containing a lot of text, except that only
a small part of that layer is shown on the screen, the rest being
clipped out. Then the absolute_bounds consider the clip
operations but the composited_bounds don’t, meaning that
we’ll make a much larger composited layer than necessary and waste a lot
of time rastering pixels that the user will never see.
Let’s fix that by also applying those clips to
composited_bounds.This is very important, because otherwise some composited
layers can end up huge despite not drawing much to the screen. A good
example of this optimization making a big difference is loading the
browser from Chapter
15 for the browser.engineering homepage,
where otherwise we would end up with an enormous composited layer for an
iframe. We’ll do it by first computing the absolute bounds
for each item, then mapping them back to local space, which will have
the effect of computing the “clipped local rect” for each display
item:
class CompositedLayer:
    def composited_bounds(self):
        rect = skia.Rect.MakeEmpty()
        for item in self.display_items:
            rect.join(absolute_to_local(
                item, local_to_absolute(item, item.rect)))
        rect.outset(1, 1)
        return rect
This requires implementing absolute_to_local:
def absolute_to_local(display_item, rect):
    parent_chain = []
    while display_item.parent:
        parent_chain.append(display_item.parent)
        display_item = display_item.parent
    for parent in reversed(parent_chain):
        rect = parent.unmap(rect)
    return rect
Which in turn relies on unmap. For Blend
these should be no-ops, but for Transform it’s just the
inverse translation:
def map_translation(rect, translation, reversed=False):
    # ...
    else:
        # ...
        if reversed:
            matrix.setTranslate(-x, -y)
        else:
            matrix.setTranslate(x, y)

class Transform(VisualEffect):
    def unmap(self, rect):
        return map_translation(rect, self.translation, True)
And with that, we now have completed the story of a pretty high-performance implementation of composited animations.
Overlap reasons for compositing not only create complications in the code, but without care from the browser and web developer can lead to a huge amount of GPU memory usage, as well as page slowdown to manage all of the additional composited layers. One way this could happen is that an additional composited layer results from one element overlapping another, and then a third because it overlaps the second, and so on. This phenomenon is called layer explosion. Our browser’s algorithm avoids this problem most of the time because it is able to merge multiple display items together as long as they have compatible ancestor effects, but in practice there are complicated situations where it’s hard to make content merge efficiently.
In addition to overlap, there are other situations where compositing has undesired side-effects leading to performance problems. For example, suppose we wanted to turn off composited scrolling in certain situations, such as on a machine without a lot of memory, but still use compositing for visual effect animations. But what if the animation is on content underneath a scroller? In practice, it can be very difficulty to implement this situation correctly without just giving up and compositing the scroller.
This chapter introduces animations. The key takeaways you should remember are:
Click here to try this chapter’s browser.
The complete set of functions, classes, and methods in our browser should now look something like this:
COOKIE_JAR
class URL:
    def __init__(url)

    def request(referrer, payload)

    def resolve(url)

    def origin()

    def __str__()
class Text:
    def __init__(text, parent)

    def __repr__()
class Element:
    def __init__(tag, attributes, parent)

    def __repr__()
def print_tree(node, indent)
def tree_to_list(tree, list)
class HTMLParser:
    SELF_CLOSING_TAGS

    HEAD_TAGS

    def __init__(body)

    def parse()

    def get_attributes(text)

    def add_text(text)

    def add_tag(tag)

    def implicit_tags(tag)

    def finish()
class CSSParser:
    def __init__(s)

    def whitespace()

    def literal(literal)

    def word()

    def ignore_until(chars)

    def pair(until)

    def selector()

    def body()

    def parse()

    def until_chars(chars)
class TagSelector:
    def __init__(tag)

    def matches(node)
class DescendantSelector:
    def __init__(ancestor, descendant)

    def matches(node)
FONTS
def get_font(size, weight, style)
def linespace(font)
NAMED_COLORS
def parse_color(color)
def parse_blend_mode(blend_mode_str)
def parse_transition(value)
def parse_transform(transform_str)
REFRESH_RATE_SEC
class MeasureTime:
    def __init__()

    def time(name)

    def stop(name)

    def finish()
class Task:
    def __init__(task_code)

    def run()
class TaskRunner:
    def __init__(tab)

    def schedule_task(task)

    def set_needs_quit()

    def clear_pending_tasks()

    def start_thread()

    def run()

    def handle_quit()
DEFAULT_STYLE_SHEET
INHERITED_PROPERTIES
def style(node, rules, tab)
def cascade_priority(rule)
def diff_styles(old_style, new_style)
class NumericAnimation:
    def __init__(old_value, new_value, num_frames)

    def animate()
WIDTH, HEIGHT
HSTEP, VSTEP
INPUT_WIDTH_PX
BLOCK_ELEMENTS
class DocumentLayout:
    def __init__(node)

    def layout()

    def should_paint()

    def paint()

    def paint_effects(cmds)
class BlockLayout:
    def __init__(node, parent, previous)

    def layout_mode()

    def layout()

    def recurse(node)

    def new_line()

    def word(node, word)

    def input(node)

    def self_rect()

    def should_paint()

    def paint()

    def paint_effects(cmds)
class LineLayout:
    def __init__(node, parent, previous)

    def layout()

    def should_paint()

    def paint()

    def paint_effects(cmds)
class TextLayout:
    def __init__(node, word, parent, previous)

    def layout()

    def should_paint()

    def paint()

    def paint_effects(cmds)
class InputLayout:
    def __init__(node, parent, previous)

    def layout()

    def should_paint()

    def paint()

    def paint_effects(cmds)

    def self_rect()
class PaintCommand:
    def __init__(rect)
class DrawText:
    def __init__(x1, y1, text, font, color)

    def execute(canvas)
class DrawRect:
    def __init__(rect, color)

    def execute(canvas)
class DrawRRect:
    def __init__(rect, radius, color)

    def execute(canvas)
class DrawLine:
    def __init__(x1, y1, x2, y2, color, thickness)

    def execute(canvas)
class DrawOutline:
    def __init__(rect, color, thickness)

    def execute(canvas)
class DrawCompositedLayer:
    def __init__(composited_layer)

    def execute(canvas)
class VisualEffect:
    def __init__(rect, children, node)
class Blend:
    def __init__(opacity, blend_mode, node, children)

    def execute(canvas)

    def map(rect)

    def unmap(rect)

    def clone(child)
class Transform:
    def __init__(translation, rect, node, children)

    def execute(canvas)

    def map(rect)

    def unmap(rect)

    def clone(child)
def local_to_absolute(display_item, rect)
def absolute_bounds_for_obj(obj)
def absolute_to_local(display_item, rect)
def map_translation(rect, translation, reversed)
def paint_tree(layout_object, display_list)
def paint_visual_effects(node, cmds, rect)
def add_parent_pointers(nodes, parent)
class CompositedLayer:
    def __init__(skia_context, display_item)

    def can_merge(display_item)

    def add(display_item)

    def composited_bounds()

    def absolute_bounds()

    def raster()
EVENT_DISPATCH_JS
SETTIMEOUT_JS
XHR_ONLOAD_JS
RUNTIME_JS
class JSContext:
    def __init__(tab)

    def run(script, code)

    def dispatch_event(type, elt)

    def dispatch_settimeout(handle)

    def dispatch_xhr_onload(out, handle)

    def get_handle(elt)

    def querySelectorAll(selector_text)

    def getAttribute(handle, attr)

    def innerHTML_set(handle, s)

    def style_set(handle, s)

    def XMLHttpRequest_send(...)

    def setTimeout(handle, time)

    def requestAnimationFrame()
SCROLL_STEP
class Tab:
    def __init__(browser, tab_height)

    def load(url, payload)

    def run_animation_frame(scroll)

    def render()

    def allowed_request(url)

    def raster(canvas)

    def clamp_scroll(scroll)

    def set_needs_render()

    def set_needs_layout()

    def set_needs_paint()

    def scrolldown()

    def click(x, y)

    def go_back()

    def submit_form(elt)

    def keypress(char)
class Chrome:
    def __init__(browser)

    def tab_rect(i)

    def paint()

    def click(x, y)

    def keypress(char)

    def enter()

    def blur()
class CommitData:
    def __init__(...)
class Browser:
    def __init__()

    def schedule_animation_frame()

    def commit(tab, data)

    def render()

    def composite_raster_and_draw()

    def composite()

    def get_latest(effect)

    def paint_draw_list()

    def raster_tab()

    def raster_chrome()

    def draw()

    def set_needs_animation_frame(tab)

    def set_needs_raster_and_draw()

    def set_needs_raster()

    def set_needs_composite()

    def set_needs_draw()

    def clear_data()

    def new_tab(url)

    def new_tab_internal(url)

    def set_active_tab(tab)

    def schedule_load(url, body)

    def clamp_scroll(scroll)

    def handle_down()

    def handle_click(e)

    def handle_key(char)

    def handle_enter()

    def handle_quit()
def mainloop(browser)
13-1 background-color. Implement animations of
the background-color CSS property. You’ll have to define a
new kind of interpolation that applies to all the color channels.
13-2 Easing functions. Our browser only implements a linear
interpolation between start and end values, but there are many other easing
functions (in fact, the default one in real browsers is
cubic-bezier(0.25, 0.1, 0.25, 1.0), not linear). Implement
this easing function, and one or two others.
13-3 Composited and threaded animations. Our browser
supports transfoms and scrolling, but they are not fully composited and
threaded, and transform transition animations are not supported.
Implement these. (Hint: for transforms, it just requires following the
same pattern as for opacity; for scrolling, it requires
setting fewer dirty bits in handle_down.) A simultaneous
transform and opacity animation should now work, without any raster,
and scrolling on that page should not raster either.
13-4 Width/height animations. (You’ll need to have done
Exercise 6-2 first.) Make width and height
animatable; you’ll need a variant of NumericAnimation that
parses and produces pixel values (the “px” suffix in the string). Since
width and height are layout-inducing, make
sure that animating them sets needs_layout. Check that
animating width in your browser changes line breaks. A width transition
example should work once you’ve implemented width animations.Width animations can’t be
composited because width affects the layout tree, not just different
display lists, which in turn means that draw commands, not just visual
effects, change. Such animations are called layout-inducing,
and they are therefore slower and typically not a good idea. Chapter 16 will look at one way to speed
them up somewhat.
One exception is resizing the browser window
with your mouse. That’s layout-inducing, but it’s very useful for the
user to see the new layout as the window size changes. Modern browsers
are fast enough to do this, but it used to be that they’d only redraw
the screen every couple of frames, leaving a visual gutter
between content and the edge of the window.
13-5 CSS animations. Implement the basics of the CSS
animations API, in particular enough of the animation
CSS property and parsing of @keyframe to implement two demos on the
browser.engineering website.
13-6 Overlap testing with transform animations. (You’ll need
to have already done Exercise 13-3.) Our browser currently does not
overlap test correctly in the presence of transform animations that
cause overlap to come and go. First create a demo that exhibits the bug,
and then fix it. One way to fix it is to enter “assume overlap mode”
whenever an animated transform display item is encountered. This means
that every subsequent display item is assumed to overlap the animating
one (even if it doesn’t at the moment), and therefore can’t merge into
any CompositedLayer earlier in the list than the animating
one. Another way is to run overlap testing on every animation frame in
the browser thread, and if the results differ from the prior frame, redo
compositing and raster. And if you’ve done Exercise 13-5, and a transform animation
is defined in terms of a CSS animation, you can analytically determine
the bounding box of the animation, and use that for overlap
instead.
13-7 Avoiding sparse composited layers. Our browser’s
algorithm currently always merges paint chunks that have compatible
ancestor effects. But this can lead to inefficient situations, such as
where two paint chunks that are visually very far away on the web page
(e.g. one at the very top and one thousands of pixels lower down) end up
in the same CompositedLayer. That can be very bad, because
it results in a huge skia.Surface that is mostly wasted GPU
memory. One way to reduce that problem is to stop merging paint chunks
that would make the total area of the skia.Surface larger
than some fixed value. Implement that.Another way is via surface tiling.
13-8 Short display lists. it’s relatively common in real
browsers to encounter CompositedLayers that are only a
single solid color, or only a few simple paint commands.A real browser would use among
its criteria whether the time to raster the provided display items is
low enough to not justify a GPU texture. This will be true for solid
colors, but probably not for complex shapes or text.
Implement an optimization that skips storing a skia.Surface
on a CompositedLayer with less than a fixed number (three,
say) of paint commands, and instead execute them directly. In other
words, raster on these CompositedLayers will
be a no-op and draw will execute the paint commands
instead.
13-9 Hit testing. Right now, when handling clicks, we
convert each layout object’s bounds to absolute coordinates (via
absolute_bounds_for_obj) to compare to the click location.
But we could instead convert the click location to local coordinates as
we traverse the layout tree. Implement that instead. It’ll probably be
convenient to define a hit_test method on each layout
object which takes in a click location, adjusts it for transforms, and
recursively calls child hit_test methods.In real browsers hit testing
is used for more than just clicking. The name comes from thinking
whether an arrow shot at that location would “hit” the
object.
13-10 z-index. Right now, elements later in the
HTML document are drawn “on top” of earlier ones. The
z-index CSS property changes that order: an element with a
larger z-index draws on top (with ties broken by the
current order, and with the default z-index being 0). For
z-index to have any effect, the element’s
position property must be set to something other than
static (the default). Add support for z-index.
For an extra challenge, add support for nested
elements with z-index properties.
13-11 Animated scrolling. Real browsers have many kinds of
animations during scroll. For example, pressing the down key or the
down-arrow in a scrollbar causes a pleasant animated scroll, rather than
the immediate scroll our browser current implements. Or on mobile, a
touch interaction often causes a “fling” scroll according to a
physics-based model of scroll momentum with friction. Implement the scroll-behavior
CSS property on the <body> element, and use it to
trigger animated scroll in handle_down, by delegating
scroll to a main thread animation.This will result in your browser losing threaded scrolling.
If you’ve implemented Exercise 13-3, you could build on that code to
animate scroll on the browser thread. You’ll need to
implement a new ScrollAnimation class and some logic in
run_animation_frame. Scrolling in the transform
transition example should now be smooth, as that example uses
scroll-behavior.These days, many websites implement a number of
scroll-linked animation effects, such as parallax. In
real life, parallax is the phenomenon that objects further away appear
to move slower than closer-in objects (due to the angle of light
changing less quickly). This can be achieved with the perspective
CSS property. This
article explains how, and this one
gives a much deeper dive into perspective in CSS generally.
There are also animations that are tied to scroll
offset but are not, strictly speaking, part of the scroll. An
example is a rotation or opacity fade on an element that advances as the
user scrolls down the page (and reverses as they scroll back up). Or
there are scroll-triggered animations that start once an
element has scrolled to a certain point on the screen, or when scroll
changes direction.
13-12 Opacity plus draw. If a
DrawCompositedLayer command occurs inside a
Blend(alpha=0.5) then right now there might be two surface
copies: first copying the composited layer’s raster buffer into a
temporary buffer, then applying opacity to it and copying it into the
root surface. This is not necessary, and in fact Skia’s draw
API on a Surface allows opacity to be applied. Optimize the
browser to combine these into one draw command when this
situation happens. (This is an important optimization in real
browsers.)
Did you find this chapter useful?