
Right now our browser can only draw colored rectangles and text—pretty boring! Real browsers support all kinds of visual effects that change how pixels and colors blend together. To implement those effects, and also make our browser faster, we’ll need control over surfaces, the key low-level feature behind fast scrolling, visual effects, animations, and many other browser capabilities. To get that control, we’ll also switch to using the Skia graphics library and even take a peek under its hood.
While Tkinter is great for basic shapes and input handling, it doesn’t give us control over surfacesThat’s because Tk, the graphics library that Tkinter uses, dates from the early 1990s, before high-performance graphics cards and GPUs became widespread. and lacks implementations of most visual effects. Implementing them ourselves would be fun, but it’s outside the scope of this book, so we need a new graphics library. Let’s use Skia, the library that Chromium uses. Unlike Tkinter, Skia doesn’t handle inputs or create graphical windows, so we’ll pair it with the SDL GUI library. Beyond new capabilities, switching to Skia will allow us to control graphics and rasterization at a lower level.
Start by installing Skia and SDL:The 1st printed edition of Web Browser Engineering used an older Skia version, and if you’re reading this website together with a printed 1st edition, make sure to check the porting notes to understand the differences between the two.
python3 -m pip install skia-python pysdl2 pysdl2-dll PyOpenGLAs elsewhere in this book, you may need to install the
pip package first, or use your IDE’s package installer. If
you’re on Linux, you’ll need to install additional dependencies, like
OpenGL and fontconfig. Also, you may not be able to install
pysdl2-dll; if so, you’ll need to find SDL in your system
package manager instead. Consult the skia-python
and pysdl2
web pages for more details.
Once installed, remove the tkinter imports from browser
and replace them with these:
import ctypes
import sdl2
import skia
The ctypes module is a standard part of Python; we’ll
use it to convert between Python and C types. If any of these imports
fail, check that Skia and SDL were installed correctly.
The <canvas>
HTML element provides a JavaScript API that is similar to Skia and
Tkinter. Combined with WebGL,
it’s possible to implement basically all of SDL and Skia in JavaScript.
Alternatively, one can compile Skia to
WebAssembly
to do the same.
The first big task is to switch to using SDL to create the window and handle events. The main loop of the browser first needs some boilerplate to get SDL started:
if __name__ == "__main__":
    sdl2.SDL_Init(sdl2.SDL_INIT_EVENTS)
    browser = Browser()
    browser.new_tab(URL(sys.argv[1]))
    # ...
Next, we need to create an SDL window, instead of a Tkinter window,
inside the Browser. Here’s the SDL incantation:
class Browser:
    def __init__(self):
        self.sdl_window = sdl2.SDL_CreateWindow(b"Browser",
            sdl2.SDL_WINDOWPOS_CENTERED, sdl2.SDL_WINDOWPOS_CENTERED,
            WIDTH, HEIGHT, sdl2.SDL_WINDOW_SHOWN)
Now that we’ve created a window, we need to handle events sent to it.
SDL doesn’t have a mainloop or bind method; we
have to implement it ourselves:
def mainloop(browser):
    event = sdl2.SDL_Event()
    while True:
        while sdl2.SDL_PollEvent(ctypes.byref(event)) != 0:
            if event.type == sdl2.SDL_QUIT:
                browser.handle_quit()
                sdl2.SDL_Quit()
                sys.exit()
            # ...
The details of ctypes and PollEvent aren’t
too important here, but note that SDL_QUIT is an event,
sent when the user closes the last open window. The
handle_quit method it calls just cleans up the window
object:
class Browser:
    def handle_quit(self):
        sdl2.SDL_DestroyWindow(self.sdl_window)
Call mainloop in place of
tkinter.mainloop:
if __name__ == "__main__":
    # ...
    mainloop(browser)
In place of all the bind calls in the
Browser constructor, we can just directly call methods for
various types of events, like clicks, typing, and so on. The SDL syntax
looks like this:
def mainloop(browser):
    while True:
        while sdl2.SDL_PollEvent(ctypes.byref(event)) != 0:
            # ...
            elif event.type == sdl2.SDL_MOUSEBUTTONUP:
                browser.handle_click(event.button)
            elif event.type == sdl2.SDL_KEYDOWN:
                if event.key.keysym.sym == sdl2.SDLK_RETURN:
                    browser.handle_enter()
                elif event.key.keysym.sym == sdl2.SDLK_DOWN:
                    browser.handle_down()
            elif event.type == sdl2.SDL_TEXTINPUT:
                browser.handle_key(event.text.text.decode('utf8'))
I’ve changed the signatures of the various event handler methods. For
example, the handle_click method is now passed a
MouseButtonEvent object, which thankfully contains
x and y coordinates, while the
handle_enter and handle_down methods aren’t
passed any argument at all, because we don’t use that argument anyway.
You’ll need to change the Browser methods’ signatures to
match.
SDL is most popular for making games. Their site lists a selection of books about game programming in SDL.
Let’s peek under the hood of these SDL calls. When we create an SDL window, we’re asking SDL to allocate a surface, a chunk of memory representing the pixels on the screen.A surface may or may not be bound to the physical pixels on the screen via a window, and there can be many surfaces. A canvas is an API interface that allows you to draw into a surface with higher-level commands such as for rectangles or text. Our browser uses separate Skia and SDL surfaces for simplicity, but in a highly optimized browser, minimizing the number of surfaces is important for good performance. Creating and managing surfaces is going to be the big focus of this chapter. On today’s large screens, surfaces take up a lot of memory, so handling surfaces well is essential to good browser performance.
A surface is a representation of a graphics buffer into which you can draw pixels (bits representing colors). We implicitly created an SDL surface when we created an SDL window; let’s also create a surface for Skia to draw to:
class Browser:
    def __init__(self):
        self.root_surface = skia.Surface.MakeRaster(
            skia.ImageInfo.Make(
                WIDTH, HEIGHT,
                ct=skia.kRGBA_8888_ColorType,
                at=skia.kUnpremul_AlphaType))
Each pixel has a color. Note the ct argument, meaning
“color type”, which indicates that each pixel of this surface should be
represented as red, green, blue, and
alpha values, each of which should take up eight bits. In other
words, pixels are basically defined like so:
class Pixel:
    def __init__(self, r, g, b, a):
        self.r = r
        self.g = g
        self.b = b
        self.a = a
This Pixel definition is an illustrative example, not
actual code in our browser. It’s standing in for somewhat more complex
code within SDL and Skia themselves.Skia actually represents colors as 32-bit integers, with
the most significant byte representing the alpha value (255 meaning
opaque and 0 meaning transparent) and the next three bytes representing
the red, green, and blue color channels.
Defining colors via red, green, and blue components is fairly
standardIt’s formally
known as the sRGB color
space, and it dates back to CRT (cathode-ray
tube) displays, which had a pretty limited gamut of
expressible colors. New technologies like LCD, LED, and OLED can display
more colors, so CSS now includes syntax for expressing
these new colors. Still, all color spaces have a limited gamut of
expressible colors. and corresponds to how computer
screens work.Actually,
some screens contain lights
besides red, green, and blue, including white, cyan, or yellow.
Moreover, different screens can use slightly different reds, greens, or
blues; professional color designers typically have to calibrate their
screen to display colors accurately. For the rest of us, the
software still communicates with the display in terms of standard red,
green, and blue colors, and the display hardware converts them to
whatever pixels it uses. For example, in CSS, we refer to
arbitrary colors with a hash character and six hex digits, like
#ffd700, with two digits each for red, green, and
blue:Alpha is implicitly
255, meaning opaque, in this case.
def parse_color(color):
    if color.startswith("#") and len(color) == 7:
        r = int(color[1:3], 16)
        g = int(color[3:5], 16)
        b = int(color[5:7], 16)
        return skia.Color(r, g, b)
The colors we’ve seen so far can just be specified in terms of this syntax:
NAMED_COLORS = {
    "black": "#000000",
    "white": "#ffffff",
    "red":   "#ff0000",
    # ...
}

def parse_color(color):
    # ...
    elif color in NAMED_COLORS:
        return parse_color(NAMED_COLORS[color])
    else:
        return skia.ColorBLACK
You can add more named colors from the
list as you come across them; the demos in this book use
blue, green, lightblue,
lightgreen, orange, orangered,
and gray. Note that unsupported colors are interpreted as
black, so that at least something is drawn to the screen.This is not the
standards-required behavior—the invalid value should just not
participate in styling, so an element styled with an unknown color might
inherit a color other than black—but I’m doing it as a
convenience.
Let’s now use our understanding of surfaces and colors to copy from the Skia surface, where we will draw the chrome and page content, to the SDL surface, which actually appears on the screen. This is a little hairy, because we are moving data between two low-level libraries, but really we’re just copying pixels from one place to another. First, get the sequence of bytes representing the Skia surface:
class Browser:
    def draw(self):
        # ...
        skia_image = self.root_surface.makeImageSnapshot()
        skia_bytes = skia_image.tobytes()
Next, we need to copy the data to an SDL surface. This requires telling SDL what order the pixels are stored in and your computer’s endianness:
class Browser:
    def __init__(self):
        if sdl2.SDL_BYTEORDER == sdl2.SDL_BIG_ENDIAN:
            self.RED_MASK = 0xff000000
            self.GREEN_MASK = 0x00ff0000
            self.BLUE_MASK = 0x0000ff00
            self.ALPHA_MASK = 0x000000ff
        else:
            self.RED_MASK = 0x000000ff
            self.GREEN_MASK = 0x0000ff00
            self.BLUE_MASK = 0x00ff0000
            self.ALPHA_MASK = 0xff000000
The CreateRGBSurfaceFrom method then wraps the data in
an SDL surface (without copying the bytes):
class Browser:
    def draw(self):
        # ...
        depth = 32 # Bits per pixel
        pitch = 4 * WIDTH # Bytes per row
        sdl_surface = sdl2.SDL_CreateRGBSurfaceFrom(
            skia_bytes, WIDTH, HEIGHT, depth, pitch,
            self.RED_MASK, self.GREEN_MASK,
            self.BLUE_MASK, self.ALPHA_MASK)
Finally, we draw all this pixel data on the window itself by blitting
(copying) it from sdl_surface to sdl_window’s
surface:Note that since
Skia and SDL are C++ libraries, they are not always consistent with
Python’s garbage collection system. So the link between the output of
tobytes and sdl_window is not guaranteed to be
kept consistent when skia_bytes is garbage-collected. The
SDL surface could be left pointing at a bogus piece of memory, leading
to memory corruption or a crash. The code here is correct because all of
these are local variables that are garbage-collected together, but if
not you need to be careful to keep all of them alive at the same
time.
class Browser:
    def draw(self):
        # ...
        rect = sdl2.SDL_Rect(0, 0, WIDTH, HEIGHT)
        window_surface = sdl2.SDL_GetWindowSurface(self.sdl_window)
        # SDL_BlitSurface is what actually does the copy.
        sdl2.SDL_BlitSurface(sdl_surface, rect, window_surface, rect)
        sdl2.SDL_UpdateWindowSurface(self.sdl_window)
So now we can copy from the Skia surface to the SDL window. One last step: we have to draw the browser to the Skia surface.
We take it for granted, but color standards like CIELAB derive from attempts to reverse-engineer human vision. Screens use red, green, and blue color channels to match the three types of cone cells in a human eye. These cone cells vary between people: some have more and some fewer (typically an inherited condition carried on the X chromosome). Moreover, different people have different ratios of cone types and those cone types use different protein structures that vary in the exact frequency of green, red, and blue that they respond to. The study of color thus combines software, hardware, chemistry, biology, and psychology.
We want to draw text, rectangles, and so on to the Skia surface. This step—coloring in the pixels of a surface to draw shapes on it—is called “rasterization” and is one important task of a graphics library. In Skia, rasterization happens via a canvas API. A canvas is just an object that draws to a particular surface:
class Browser:
    def draw(self, canvas, offset):
        # ...
        canvas = self.root_surface.getCanvas()
        # ...
Let’s change the various classes to use Skia’s raster APIs.
The first thing we need to do is change the rect field
into a Skia Rect object. Get rid of the old
Rect class that was introduced in Chapter 7 in favor of skia.Rect.
Everywhere that a Rect was constructed, instead put
skia.Rect.MakeLTRB (for “make left-top-right-bottom”) or
MakeXYWH (for “make x-y-width-height”).
Everywhere that the sides of the rectangle (e.g., left)
were checked, replace them with the corresponding function on a Skia
Rect (e.g., left()). Also replace calls to
containsPoint with Skia’s contains.
For DrawText and DrawLine in particular,
it’s:
class DrawText:
    def __init__(self, x1, y1, text, font, color):
        self.rect = skia.Rect.MakeLTRB(
            x1, y1,
            x1 + font.measureText(text),
            y1 - font.getMetrics().fAscent \
                + font.getMetrics().fDescent)
        # ...

class DrawLine:
    def __init__(self, x1, y1, x2, y2, color, thickness):
        self.rect = skia.Rect.MakeLTRB(x1, y1, x2, y2)
        # ...
Our browser’s drawing commands will need to invoke Skia methods on
this canvas. To draw a line, you use Skia’s Path
object:Consult the Skia and skia-python
documentation for more on the Skia API.
class DrawLine:
    def execute(self, scroll, canvas):
        path = skia.Path().moveTo(
            self.rect.left(), self.rect.top() - scroll) \
                .lineTo(self.rect.right(),
                    self.rect.bottom() - scroll)
        paint = skia.Paint(
            Color=parse_color(self.color),
            StrokeWidth=self.thickness,
            Style=skia.Paint.kStroke_Style,
        )
        canvas.drawPath(path, paint)
Note the steps involved here. We first create a Path
object, and then call drawPath to actually draw this path
to the canvas. This drawPath call takes a second argument,
paint, which defines how to actually perform this drawing.
We specify the color, but we also need to specify that we want to draw a
line along the path, instead of filling in the interior of the
path, which is the default. To do that we set the style to “stroke”, a
standard term referring to drawing along the border of some shape.The opposite is “fill”,
meaning filling in the interior of the shape.
We do something similar to draw text using
drawString:
class DrawText:
    def execute(self, scroll, canvas):
        paint = skia.Paint(
            AntiAlias=True,
            Color=parse_color(self.color),
        )
        baseline = self.rect.top() - scroll \
            - self.font.getMetrics().fAscent
        canvas.drawString(self.text, float(self.rect.left()),
            baseline, self.font, paint)
Note again that we create a Paint object identifying the
color and asking for anti-aliased text.“Anti-alias”ing just means
drawing some semi-transparent pixels to better approximate the shape of
the text. This is important when drawing shapes with fine details, like
text, but is less important when drawing large shapes like rectangles
and lines. We don’t specify the “style” because we want to
fill the interior of the text, the default.
Finally, for drawing rectangles you use drawRect:
class DrawRect:
    def execute(self, scroll, canvas):
        paint = skia.Paint(
            Color=parse_color(self.color),
        )
        canvas.drawRect(self.rect.makeOffset(0, -scroll), paint)
To create an outline, draw a rectangle but set the Style
parameter of the Paint to Stroke_Style:
class DrawOutline:
    def execute(self, scroll, canvas):
        paint = skia.Paint(
            Color=parse_color(self.color),
            StrokeWidth=self.thickness,
            Style=skia.Paint.kStroke_Style,
        )
        canvas.drawRect(self.rect.makeOffset(0, -scroll), paint)
Since we’re replacing Tkinter with Skia, we are also replacing
tkinter.font. In Skia, a font object has two pieces: a
Typeface, which is a type family with a certain weight,
style, and width; and a Font, which is a
Typeface at a particular size. It’s the
Typeface that contains data and caches, so that’s what we
need to cache:
def get_font(size, weight, style):
    key = (weight, style)
    if key not in FONTS:
        if weight == "bold":
            skia_weight = skia.FontStyle.kBold_Weight
        else:
            skia_weight = skia.FontStyle.kNormal_Weight
        if style == "italic":
            skia_style = skia.FontStyle.kItalic_Slant
        else:
            skia_style = skia.FontStyle.kUpright_Slant
        skia_width = skia.FontStyle.kNormal_Width
        style_info = \
            skia.FontStyle(skia_weight, skia_width, skia_style)
        font = skia.Typeface('Arial', style_info)
        FONTS[key] = font
    return skia.Font(FONTS[key], size)
Our browser also needs font metrics and measurements. In Skia, these
are provided by the measureText and getMetrics
methods. Let’s start with measureText replacing all calls
to measure. For example, in the paint method
in InputLayout, we must do:
class InputLayout:
    def paint(self):
        if self.node.is_focused:
            cx = self.x + self.font.measureText(text)
            # ...
There are measure calls in several other layout objects
(both in paint and layout), in
DrawText, in the draw method on
Chrome, in the text method in
BlockLayout, and in the layout method in
TextLayout. Update all of them to use
measureText.
Also, in the layout method of LineLayout
and in DrawText we make calls to the metrics
method on fonts. In Skia, this method is called getMetrics,
and to get the ascent and descent we need the fAscent and
fDescent fields on its result.
Importantly, in Skia the ascent needs to be negated. In Skia, ascent
and descent are positive if they go downward and negative if they go
upward, so ascents will normally be negative, the opposite of Tkinter.
There’s no analog for the linespace field that Tkinter
provides, but you can use descent minus ascent instead:
def linespace(font):
    metrics = font.getMetrics()
    return metrics.fDescent - metrics.fAscent
You should now be able to run the browser again. It should look and behave just as it did in previous chapters, and it might feel faster on complex pages, because Skia and SDL are in general faster than Tkinter. If the transition felt easy—well, that’s one of the benefits to abstracting over the drawing backend using a display list!
Finally, Skia also provides some new features. For example, Skia has
native support for rounded rectangles via RRect objects. We
can implement that by converting DrawRect to
DrawRRect:
class DrawRRect:
    def __init__(self, rect, radius, color):
        self.rect = rect
        self.rrect = skia.RRect.MakeRectXY(rect, radius, radius)
        self.color = color

    def execute(self, scroll, canvas):
        paint = skia.Paint(
            Color=parse_color(self.color),
        )
        canvas.drawRRect(self.rrect, paint)
Then we can draw these rounded rectangles for backgrounds:
class BlockLayout:
    def paint(self):
        if bgcolor != "transparent":
            radius = float(
                self.node.style.get(
                    "border-radius", "0px")[:-2])
            cmds.append(DrawRRect(
                self.self_rect(), radius, bgcolor))
With that, this example:Note that the example listed here, in common with other examples present in the book, accesses a local resource (a CSS file in this case) that is also present on browser.engineering.
<link rel=stylesheet href="example11-longword.css">
<div>
Background is rounded
</div>
will round the corners of its background (see Figure 1).
Similar changes should be made to InputLayout. New
shapes, like rounded rectangles, is one way that Skia is a more advanced
rasterization library than Tk. More broadly, since Skia is also used by
Chromium, we know it has fast, built-in support for all of the shapes we
might need in a browser.
Font rasterization is surprisingly deep, with techniques such as subpixel rendering and hinting used to make fonts look better on lower-resolution screens. These techniques are much less necessary on high-pixel-density screens, though. It’s likely that all screens will eventually be high-density enough to retire these techniques.
Skia and SDL have just made our browser more complex, but the low-level control offered by these libraries is important because it allows us to optimize common interactions like scrolling.
So far, any time the user scrolled a web page, we had to clear the canvas and re-raster everything on it from scratch. This is inefficient—we’re drawing the same pixels, just in a different place. When the context is complex or the screen is large, rastering too often produces a visible slowdown and drains laptop and mobile batteries. Real browsers optimize scrolling using a technique I’ll call browser compositing: drawing the whole web page to a hidden surface, and only copying the relevant pixels to the window itself.
To implement this, we’ll need two new Skia surfaces: a surface for
browser chrome and a surface for the current Tab’s
contents. We’ll only need to re-raster the Tab surface if
page contents change, but not when (say) the user types into the address
bar. And we can scroll the Tab without any raster at all—we
just copy a different part of the current Tab surface to
the screen. Let’s call those surfaces chrome_surface and
tab_surface:We could even use a different surface for each
Tab, but real browsers don’t do this, since each surface
uses up a lot of memory, and typically users don’t notice the small
raster delay when switching tabs.
class Browser:
    def __init__(self):
        # ...
        self.chrome_surface = skia.Surface(
            WIDTH, math.ceil(self.chrome.bottom))
        self.tab_surface = None
I’m not explicitly creating tab_surface right away,
because we need to lay out the page contents to know how tall the
surface needs to be.
We’ll also need to split the browser’s draw method into
three parts:
raster_tab will raster the page to the
tab_surface;raster_chrome will raster the browser chrome to the
chrome_surface;draw will composite the chrome and tab surfaces and
copy the result from Skia to SDL.It might seem wasteful to copy from the chrome and tab
surfaces to an intermediate Skia surface, instead of directly to the SDL
surface. It is, but skipping that copy requires a lot of tricky
low-level code. In Chapter 13 we’ll avoid
this copy in a different, better way.Let’s start by doing the split:
class Browser:
    def raster_tab(self):
        canvas = self.tab_surface.getCanvas()
        canvas.clear(skia.ColorWHITE)
        # ...

    def raster_chrome(self):
        canvas = self.chrome_surface.getCanvas()
        canvas.clear(skia.ColorWHITE)
        # ...

    def draw(self):
        canvas = self.root_surface.getCanvas()
        canvas.clear(skia.ColorWHITE)
        # ...
Since we didn’t create the tab_surface on startup, we
need to create it at the top of raster_tab:For a very big web page,
tab_surface can be much larger than the size of the SDL
window, and therefore take up a very large amount of memory. We’ll
ignore that, but a real browser would only paint and raster surface
content up to a certain distance from the visible region, and
re-paint/raster as the user scrolls.
import math

class Browser:
    def raster_tab(self):
        tab_height = math.ceil(
            self.active_tab.document.height + 2*VSTEP)

        if not self.tab_surface or \
                tab_height != self.tab_surface.height():
            self.tab_surface = skia.Surface(WIDTH, tab_height)

        # ...
Note that we need to recreate the tab surface if the page’s height changes. The way we compute the page bounds here, based on the layout tree’s height, would be incorrect if page elements could stick out below (or to the right) of their parents—but our browser doesn’t support any features like that.
Next, draw should copy from the chrome and tab surfaces
to the root surface. Moreover, we need to translate the
tab_surface down by chrome.bottom and up by
scroll, and clip it to just the area of the window that
doesn’t overlap the browser chrome:
class Browser:
    def draw(self):
        # ...

        tab_rect = skia.Rect.MakeLTRB(
            0, self.chrome.bottom, WIDTH, HEIGHT)
        tab_offset = self.chrome.bottom - self.active_tab.scroll
        canvas.save()
        canvas.clipRect(tab_rect)
        canvas.translate(0, tab_offset)
        self.tab_surface.draw(canvas, 0, 0)
        canvas.restore()

        chrome_rect = skia.Rect.MakeLTRB(
            0, 0, WIDTH, self.chrome.bottom)
        canvas.save()
        canvas.clipRect(chrome_rect)
        self.chrome_surface.draw(canvas, 0, 0)
        canvas.restore()

        # ...
Note the draw calls: these copy the
tab_surface and chrome_surface to the
canvas, which is bound to root_surface. The
clipRect and translate calls make sure we copy
the right parts.
Finally, everywhere in Browser that we call
draw, we now need to call either raster_tab or
raster_chrome first. For example, in
handle_click, we do this:
class Browser:
    def handle_click(self, e):
        if e.y < self.chrome.bottom:
            # ...
            self.raster_chrome()
        else:
            # ...
            self.raster_tab()
        self.draw()
Notice how we don’t redraw the chrome when only the tab changes, and
vice versa. Likewise, in handle_down, we don’t need to call
raster_tab at all, since scrolling doesn’t change the
page.
However, clicking on a web page can cause it to navigate to a new one, so we do need to detect that and raster the browser chrome if the URL changed:
class Browser:
    def handle_click(self, e):
        if e.y < self.chrome.bottom:
            # ...
        else:
            # ...
            url = self.active_tab.url
            tab_y = e.y - self.chrome.bottom
            self.active_tab.click(e.x, tab_y)
            if self.active_tab.url != url:
                self.raster_chrome()
            self.raster_tab()
We also have some related changes in Tab. Let’s rename
Tab’s draw method to raster. In
it, we no longer need to pass around the scroll offset to the
execute methods, or account for chrome.bottom,
because we always draw the whole tab to the tab surface:
class Tab:
    def raster(self, canvas):
        for cmd in self.display_list:
            cmd.execute(canvas)
Likewise, we can remove the scroll parameter from each
drawing command’s execute method:
class DrawRect:
    def execute(self, canvas):
        paint = skia.Paint(
            Color=parse_color(self.color),
        )
        canvas.drawRect(self.rect, paint)
Our browser now uses composited scrolling, making scrolling faster and smoother, all because we are now using a mix of intermediate surfaces to store already-rastered content and avoid re-rastering unless the content has actually changed.
Real browsers allocate new surfaces for various different situations,
such as implementing accelerated overflow scrolling and animations of
certain CSS properties such as transform
and opacity that can be done without raster. They also allow scrolling
arbitrary HTML elements via overflow: scroll
in CSS. Basic scrolling for DOM elements is very similar to what we’ve
just implemented. But implementing it in its full generality, and with
excellent performance, is extremely challenging. Scrolling may
well be the single most complicated feature in a browser rendering
engine. The corner cases and subtleties involved are almost endless.
Drawing shapes quickly is already a challenge, but with multiple shapes there’s an additional question: what color should the pixel be when two shapes overlap? So far, our browser has only handled opaque shapes,It also hasn’t considered subpixel geometry or anti-aliasing, which also rely on color mixing. and the answer has been simple: take the color of the top shape. But now we need more nuance.
Consider partially transparent colors in CSS. These use a hex color
with eight hex digits, with the last two indicating the level of
transparency. For example, the color #00000080 is 50%
transparent black. Over a white background, that looks gray, but over an
orange background it looks like Figure 2.
Figure 2: Example of black semi-transparent text blending into an orange background.
Note that the text is a kind of dark orange, because its color is a mix of 50% black and 50% orange. Many objects in the real world are partially transparent: frosted glass, clouds, or colored paper, for example. Looking through one, you see multiple colors blended together. That’s also why computer screens work: the red, green, and blue lights blend together and appear to our eyes as another color. Designers use this effectMostly. Some more advanced blending modes on the web are difficult, or perhaps impossible, in real-world physics. in overlays, shadows, and tooltips, so our browser needs to support color mixing.
Skia supports this kind of transparency by setting the “alpha” field on the parsed color:
def parse_color(color):
    # ...
    elif color.startswith("#") and len(color) == 9:
        r = int(color[1:3], 16)
        g = int(color[3:5], 16)
        b = int(color[5:7], 16)
        a = int(color[7:9], 16)
        return skia.Color(r, g, b, a)
    # ...
Check that your browser renders dark-orange text for the example above. That shows that it’s actually mixing the black color with the existing orange color from the background.
However, there’s another, subtly different way to create transparency
with CSS. Here, 50% transparency is applied to the whole element using
the opacity property, as in Figure 3.
Figure 3: Example of black text on an orange background, then blended semi-transparently into its ancestor.
Now the opacity applies to both the background and the text, so the background is now a little lighter. But note that the text is now gray, not dark orange. The black and orange pixels are no longer blended together!
That’s because opacity introduces what CSS calls a stacking context. Most of the details aren’t important right now, but the order of operations is. In the first example, the black pixels were first made transparent, then blended with the background. Thus, 50% transparent black pixels were blending with orange pixels, resulting in a dark-orange color. In the second example, the black pixels were first blended with the background, then the result was made transparent. Thus, fully black pixels replaced fully orange ones, resulting in just black pixels, which were later made 50% transparent.
Applying blending in the proper order, as is necessary to implement
effects like opacity, requires more careful handling of
surfaces.
Mostly, elements form
a stacking context because of CSS properties that have something to
do with layering (like z-index) or visual effects (like
mix-blend-mode). On the other hand, the
overflow property, which can make an element scrollable,
does not induce a stacking context, which I think was a mistake.While we’re at it, perhaps
scrollable elements should also be a containing
block for descendants. Otherwise, a scrollable element can have
non-scrolling children via properties like position. This
situation is very complicated to handle in real browsers.
The reason is that inside a modern browser, scrolling is done on the GPU
by offsetting two surfaces. Without a stacking context the browser might
(depending on the web page structure) have to move around multiple
independent surfaces with complex paint orders, in lockstep, to achieve
scrolling. Fixed- and sticky-positioned elements also form stacking
contexts because of their interaction with scrolling.
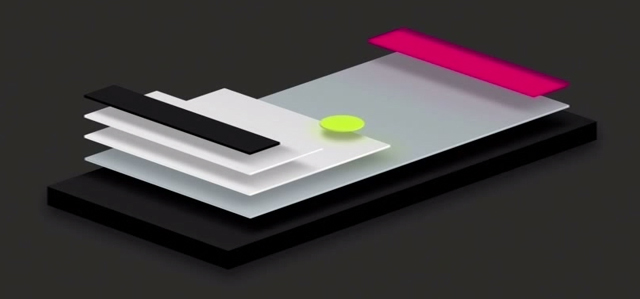
To handle the order of operations properly, browsers apply blending
not to individual shapes but to a tree of surfaces (see Figure 4).
Conceptually, each shape is drawn to its own surface, and then blended
into its parent surface. Different structures of intermediate surfaces
create different visual effects.You can see a more detailed discussion of how the tree
structure affects the final image, and how that impacted the CSS
specifications, on David
Baron’s blog. Rastering a web page requires a
bottom-up traversal of this conceptual tree: to raster a surface you
first need to raster its contents, including its child surfaces, and
then the contents need to be blended together into the parent.This tree of surfaces is an
implementation strategy and not something required by any specific web
API. However, the concept of a stacking
context is related. A stacking context is technically a
mechanism to define groups and ordering during paint, and stacking
contexts need not correspond to a surface (e.g. ones created via z-index
do not). However, for ease of implementation, all visual effects in CSS
that generally require surfaces to implement are specified to go
hand-in-hand with a stacking context, so the tree of stacking contexts
is very related to the tree of surfaces.
To match this use pattern, in Skia, surfaces form a stack. You can push a new surface on the stack, raster things to it, and then pop it off, which blends it with the surface below. When rastering, you push a new surface onto the stack every time you need to apply some visual effect, and pop-and-blend once you’re done rastering all the elements that that effect will be applied to, like this:
# draw parent
canvas.saveLayer(None, skia.Paint(Alphaf=0.5))
# draw children
canvas.restore()
Here, the saveLayer call asks SkiaIt’s called
saveLayer instead of createSurface because
Skia doesn’t actually promise to create a new surface, if it can
optimize that away. So what you’re really doing with
saveLayer is telling Skia that there is a new conceptual
layer (“piece of paper”) on the stack. Skia’s terminology distinguishes
between a layer and a surface for this reason as well, but for our
purposes it makes sense to assume that each new layer comes with a
surface. to draw all the children to a separate surface
before blending them into the parent once restore is
called. The second parameter to saveLayer specifies the
specific type of blending, here with the Alphaf parameter
requesting 50% opacity.
saveLayer and restore are like a pair of
parentheses enclosing child drawing operations. This means our display
list is no longer just a linear sequence of drawing operations, but a
tree. So in our display list, let’s handle opacity with an
Opacity command that takes a sequence of other drawing
commands as an argument:
class Opacity:
    def __init__(self, opacity, children):
        self.opacity = opacity
        self.children = children
        self.rect = skia.Rect.MakeEmpty()
        for cmd in self.children:
            self.rect.join(cmd.rect)

    def execute(self, canvas):
        paint = skia.Paint(
            Alphaf=self.opacity
        )
        canvas.saveLayer(None, paint)
        for cmd in self.children:
            cmd.execute(canvas)
        canvas.restore()
We can now wrap the drawing commands painted by an element with
Opacity to add transparency to the whole element. I’m going
to do this by adding a new paint_effects method to layout
objects, which should be passed a list of drawing commands to wrap:
class BlockLayout:
    def paint_effects(self, cmds):
        cmds = paint_visual_effects(
            self.node, cmds, self.self_rect())
        return cmds
I put the actual construction of the Opacity command in
a new global paint_visual_effects method (because other
object types will also need it):
def paint_visual_effects(node, cmds, rect):
    opacity = float(node.style.get("opacity", "1.0"))

    return [
        Opacity(opacity, cmds)
    ]
A change is now needed in paint_tree to call
paint_effects, but only after recursing into
children, and only if should_paint is true. That’s because
these visual effects apply to the entire subtree’s display list, not
just the current object, and don’t apply to “anonymous” objects (see
Chapter 8).
def paint_tree(layout_object, display_list):
    if layout_object.should_paint():
        cmds = layout_object.paint()
    for child in layout_object.children:
        paint_tree(child, cmds)

    if layout_object.should_paint():
        cmds = layout_object.paint_effects(cmds)
    display_list.extend(cmds)
Note that paint_visual_effects receives a list of
commands and returns another list of commands. It’s just that the output
list is always a single Opacity command that wraps the
original content—which makes sense, because first we need to draw the
commands to a surface, and then apply transparency to it when
blending into the parent.
I highly recommend a blog post by Bartosz Ciechanowski, that gives a really nice visual overview of many of the concepts explored in this chapter, plus way more content about how a library such as Skia might implement features like raster sampling of vector graphics for lines and text and interpolation of surfaces when their pixel arrays don’t match in resolution or orientation.
Now let’s pause and explore how opacity actually works under the hood. Skia, SDL, and many other color libraries account for opacity with a fourth alpha value for each pixel.The difference between opacity and alpha can be confusing. Think of opacity as a visual effect applied to content, but alpha as a part of content. Think of alpha as implementation technique for representing opacity. An alpha of 0 means the pixel is fully transparent (meaning, no matter what the colors are, you can’t see them anyway), and an alpha of 1 means fully opaque.
When a pixel with alpha overlaps another pixel, the final color is a
mix of their two colors. How exactly the colors are mixed is defined by
Skia’s Paint objects. Of course, Skia is pretty complex,
but we can sketch these paint operations in Python as methods on the
conceptual Pixel class I introduced earlier.
When we apply a Paint with an Alphaf
parameter, the first thing Skia does is add the requested opacity to
each pixel:
class Pixel:
    def alphaf(self, opacity):
        self.a = self.a * opacity
I want to emphasize that this code is not a part of our browser—I’m simply using Python code to illustrate what Skia is doing internally.
That Alphaf parameter applies to pixels in one surface.
But with saveLayer we will end up with two surfaces, with
all of their pixels aligned, and therefore we will need to combine, or
blend, corresponding pairs of pixels.
Here, the terminology can get confusing: we imagine that the pixels “on top” are blending into the pixels “below”, so we call the top surface the source surface, with source pixels, and the bottom surface the destination surface, with destination pixels. When we combine them, there are lots of ways we could do it, but the default on the web is called “simple alpha compositing” or source-over compositing. In Python, the code to implement it looks like this:The formula for this code can be found here. Note that that page refers to premultiplied alpha colors, but Skia’s API generally does not use premultiplied representations, and this code doesn’t either. (Skia does represent colors internally in a premultiplied form, however.)
class Pixel:
    def source_over(self, source):
        new_a = source.a + self.a * (1 - source.a)
        if new_a == 0: return self
        self.r = \
            (self.r * (1 - source.a) * self.a + \
                source.r * source.a) / new_a
        self.g = \
            (self.g * (1 - source.a) * self.a + \
                source.g * source.a) / new_a
        self.b = \
            (self.b * (1 - source.a) * self.a + \
                source.b * source.a) / new_a
        self.a = new_a
Here, the destination pixel self is modified to blend in
the source pixel source. The mathematical expressions for
the red, green, and blue color channels are identical, and basically
average the source and destination colors, weighted by alpha.For example, if the alpha of
the source pixel is 1, the result is just the source pixel color, and if
it is 0 the result is the backdrop pixel color. You might
imagine the overall operation of saveLayer with an
Alphaf parameter as something like this:In reality, reading individual
pixels into memory to manipulate them like this is slow, so libraries
such as Skia don’t make it convenient to do so. (Skia canvases do have
peekPixels and readPixels methods that are
sometimes used, but not for this.)
for (x, y) in destination.coordinates():
    source[x, y].alphaf(opacity)
    destination[x, y].source_over(source[x, y])
Source-over compositing is one way to combine two pixel values. But it’s not the only method—you could write literally any computation that combines two pixel values if you wanted. Two computations that produce interesting effects are traditionally called “multiply” and “difference” and use simple mathematical operations.
“Multiply” multiplies the color values:
class Pixel:
    def multiply(self, source):
        self.r = self.r * source.r
        self.g = self.g * source.g
        self.b = self.b * source.b
And “difference” computes their absolute differences:
class Pixel:
    def difference(self, source):
        self.r = abs(self.r - source.r)
        self.g = abs(self.g - source.g)
        self.b = abs(self.b - source.b)
CSS supports these and many other blending modesMany of these blending modes
are common to
other graphics editing programs like Photoshop and GIMP. Some, like “dodge” and
“burn”, go back to analog photography, where photographers would
expose some parts of the image more than others to manipulate their
brightness. via the mix-blend-mode
property, like this:
<div style="background-color:orange">
    Parent
    <div style="background-color:blue;mix-blend-mode:difference">
        Child
    </div>
    Parent
</div>
This HTML will look like Figure 5.
Parent
Figure 5: Example of the difference value for
mix-blend-mode with a blue child and orange parent,
resulting in pink.
Here, when blue overlaps with orange, we see pink: blue has (red,
green, blue) color channels of (0, 0, 1), and orange has
(1, 0.65, 0), so with “difference” blending the resulting
pixel will be (1, 0.65, 1), which is pink. On a pixel
level, what’s happening is something like this:
for (x, y) in destination.coordinates():
    source[x, y].alphaf(opacity)
    source[x, y].difference(destination[x, y])
    destination[x, y].source_over(source[x, y])
This looks weird, but conceptually it blends the destination into the source (which ignores alpha) and then draws the source over the destination (with alpha considered). In some sense, blending thus happens twice.
Skia supports the multiply and difference blend modes natively:
def parse_blend_mode(blend_mode_str):
    if blend_mode_str == "multiply":
        return skia.BlendMode.kMultiply
    elif blend_mode_str == "difference":
        return skia.BlendMode.kDifference
    else:
        return skia.BlendMode.kSrcOver
We can then support blending in our browser by defining a new
Blend operation:
class Blend:
    def __init__(self, blend_mode, children):
        self.blend_mode = blend_mode

        self.children = children
        self.rect = skia.Rect.MakeEmpty()
        for cmd in self.children:
            self.rect.join(cmd.rect)

    def execute(self, canvas):
        paint = skia.Paint(
            BlendMode=parse_blend_mode(self.blend_mode),
        )
        canvas.saveLayer(None, paint)
        for cmd in self.children:
            cmd.execute(canvas)
        canvas.restore()
Applying it when mix-blend-mode is set just requires a
simple change to paint_visual_effects:
def paint_visual_effects(node, cmds, rect):
    # ...
    blend_mode = node.style.get("mix-blend-mode")

    return [
        Blend(blend_mode, [
            Opacity(opacity, cmds),
        ]),
    ]
Note the order of operations here: we first apply
transparency, and then blend the result into the rest of the
page. If we switched the Opacity and Blend
calls there wouldn’t be anything to blend it into!
Alpha might seem intuitive, but it’s less obvious than you think:
see, for example, this history of
alpha written by its co-inventor (and co-founder of Pixar). And
there are several different implementation options. For example, many
graphics libraries, Skia included, multiply the color channels by the
opacity instead of allocating a whole color channel. This premultiplied
representation is generally more efficient; for example,
source_over above had to divide by self.a at
the end, because otherwise the result would be premultiplied. Using a
premultiplied representation throughout would save a division. Nor is it
obvious how alpha behaves when
resized.
The “multiply” and “difference” blend modes can seem kind of obscure, but blend modes are a flexible way to implement per-pixel operations. One common use case is clipping—intersecting a surface with a given shape. It’s called clipping because it’s like putting a second piece of paper (called a mask) over the first one, and then using scissors to cut along the mask’s edge.
There are all sorts of powerful methodsThe CSS clip-path
property lets you specify a mask shape using a curve, while the mask
property lets you instead specify a image URL for the
mask. for clipping content on the web, but the most common
form involves the overflow property. This property has lots
of possible values,For
example, overflow: scroll adds scroll bars and makes an
element scrollable, while overflow: hidden is similar to
but subtly different from overflow: clip. but
let’s focus here on overflow: clip, which cuts off contents
of an element that are outside the element’s bounds.
Usually, overflow: clip is used with properties like
height or rotate which can make an element’s
children poke outside their parent. Our browser doesn’t support these,
but there is one edge case where overflow: clip is
relevant: rounded corners.Technically, clipping is also relevant for our browser with
single words that are longer than the browser window’s width. Here is an example; visually
it looks like Figure 6. Consider this example:

<div
  style="border-radius:30px;background-color:lightblue;overflow:clip">
    This test text exists here to ensure that the "div" element is
    large enough that the border radius is obvious.
</div>
That HTML looks like Figure 7.
This test text exists here to ensure that the “div” element is large enough that the border radius is obvious.
Figure 7: An example of overflow from text children of a div with
overflow:clip and border-radius being clipped
out.
Observe that the letters near the corner are cut off to maintain a
sharp rounded edge. That’s clipping; without the
overflow: clip property these letters would instead be
fully drawn.
Counterintuitively, we’ll implement clipping using blending modes. We’ll make a new surface (the mask), draw a rounded rectangle into it, and then blend it with the element contents. But we want to see the element contents, not the mask, so when we do this blending we will use destination-in compositing.
Destination-in compositing basically means keeping the pixels of the destination surface that intersect with the source surface. The source surface’s color is not used—just its alpha. In our case, the source surface is the rounded rectangle mask and the destination surface is the content we want to clip, so destination-in fits perfectly. In code, destination-in looks like this:
class Pixel:
    def destination_in(self, source):
        self.a = self.a * source.a
Now, in paint_visual_effects, we need to create a new
layer, draw the mask image into it, and then blend it with the element
contents with destination-in blending:
def paint_visual_effects(node, cmds, rect):
    # ...
    if node.style.get("overflow", "visible") == "clip":
        border_radius = float(node.style.get(
            "border-radius", "0px")[:-2])
        cmds.append(Blend("destination-in", [
            DrawRRect(rect, border_radius, "white")
        ]))

    return [
        Blend(blend_mode, [
            Opacity(opacity, cmds),
        ]),
    ]
Here I pass destination-in as the blend mode, though
note that this is a bit of a hack and that isn’t actually a valid value
of mix-blend-mode:
def parse_blend_mode(blend_mode_str):
    # ...
    elif blend_mode_str == "destination-in":
        return skia.BlendMode.kDstIn
    # ...
After drawing all of the element contents with cmds (and
applying opacity), this code draws a rounded rectangle on another layer
to serve as the mask, and uses destination-in blending to clip the
element contents. Here I chose to draw the rounded rectangle in white,
but the color doesn’t matter as long as it’s opaque.
Notice how similar this masking technique is to the physical analogy
with scissors described earlier, with the two layers playing the role of
two sheets of paper and destination-in compositing playing the role of
the scissors.If all our
browser wanted to clip were rounded rectangles, Skia actually provides a
specialized clipRRect operation. It’s more efficient than
destination-in blending because it applies as other commands are being
drawn, and so can skip drawing anything outside the clipped region. This
requires specialized code in each of Skia’s shaders, or GPU
programs, so can only be done for a couple of common shapes.
Destination-in blending is more general.
Rounded corners have an interesting
history in computing. Features that are simple today were very
complex to implement on early personal computers with limited memory
and no hardware floating-point arithmetic. Even when floating-point
hardware and eventually GPUs became standard, the
border-radius CSS property didn’t appear in browsers until
around 2010.The lack of
support didn’t stop web developers from putting rounded corners on their
sites before border-radius was supported. There are a
number of clever ways to do it; a
video from 2008 walks through several. More recently,
the introduction of animations, visual effects, multi-process
compositing, and hardware
overlays have made rounded corners pretty complex to implement. The
clipRRect fast path, for example, can fail to apply for
cases such as hardware video overlays and nested rounded corner
clips.
Our browser now works correctly, but uses way too many surfaces. For
example, for a single, no-effects-needed div with some text
content, there are currently 18 surfaces allocated in the display list.
If there’s no blending going on, we should only need one!
Let’s review all the surfaces that our code can create for an element:
But not every element has opacity, blend modes, or clipping applied,
and we could skip creating those surfaces most of the time. For example,
there’s no reason to create a surface in Opacity if no
opacity is actually applied:
class Opacity:
    def execute(self, canvas):
        paint = skia.Paint(
            Alphaf=self.opacity,
        )
        if self.opacity < 1:
            canvas.saveLayer(None, paint)
        for cmd in self.children:
            cmd.execute(canvas)
        if self.opacity < 1:
            canvas.restore()
Similarly, Blend doesn’t necessarily need to create a
layer if there’s no blending going on. But the logic here is a little
trickier: the Blend operation not only applies blending but
also isolates the element contents, which matters if they are being
clipped by overflow. So let’s skip creating a layer in
Blend when there’s no blending mode, but let’s set the
blend mode to a special, non-standard source-over value
when we need clipping:
def paint_visual_effects(node, cmds, rect):
    if node.style.get("overflow", "visible") == "clip":
        if not blend_mode:
            blend_mode = "source-over"
        # ...
We’ll parse that as the default source-over blend mode:
def parse_blend_mode(blend_mode_str):
    # ...
    elif blend_mode_str == "source-over":
        return skia.BlendMode.kSrcOver
    # ...
This is actually unnecessary, since parse_blend_mode
already parses unknown strings as source-over blending, but it’s good to
be explicit. Anyway, now Blend can skip
saveLayer if no blend mode is passed:
class Blend:
    def execute(self, canvas):
        paint = skia.Paint(
            BlendMode=parse_blend_mode(self.blend_mode),
        )
        if self.blend_mode:
            canvas.saveLayer(None, paint)
        for cmd in self.children:
            cmd.execute(canvas)
        if self.blend_mode:
            canvas.restore()
So now we skip creating extra surfaces when Opacity and
Blend aren’t really necessary. But there’s still one case
where we use too many: both Opacity and Blend
can create a surface instead of sharing one. Let’s fix that by just
merging opacity into Blend:This works for opacity, but
not for filters that “move pixels” such as blur.
Such a filter needs to be applied before clipping, not when blending
into the parent surface. Otherwise, the edge of the blur will not be
sharp.
class Blend:
    def __init__(self, opacity, blend_mode, children):
        self.opacity = opacity
        self.blend_mode = blend_mode
        self.should_save = self.blend_mode or self.opacity < 1

        self.children = children
        self.rect = skia.Rect.MakeEmpty()
        for cmd in self.children:
            self.rect.join(cmd.rect)

    def execute(self, canvas):
        paint = skia.Paint(
            Alphaf=self.opacity,
            BlendMode=parse_blend_mode(self.blend_mode),
        )
        if self.should_save:
            canvas.saveLayer(None, paint)
        for cmd in self.children:
            cmd.execute(canvas)
        if self.should_save:
            canvas.restore()
Now paint_visual_effects looks like this:
def paint_visual_effects(node, cmds, rect):
    # ...

    if node.style.get("overflow", "visible") == "clip":
        # ...
        cmds.append(Blend(1.0, "destination-in", [
            DrawRRect(rect, border_radius, "white")
        ]))

    return [Blend(opacity, blend_mode, cmds)]
Note that I’ve specified an opacity of 1.0 for the clip
Blend.
Implementing high-quality raster libraries is very interesting in its own right—check out Real-Time Rendering for more.There is also Computer Graphics: Principles and Practice, which incidentally I remember buying—this is Chris speaking—back in the days of my youth (1992 or so). At the time I didn’t get much further than rastering lines and polygons (in assembly language!). These days you can do the same and more with Skia and a few lines of Python. These days, it’s especially important to leverage GPUs when they’re available, and browsers often push the envelope. Browser teams typically include or work closely with raster library experts: Skia for Chromium and Core Graphics for WebKit, for example. Both of these libraries are used outside of the browser, too: Core Graphics in iOS and macOS, and Skia in Android.
So there you have it: our browser can draw not only boring text and boxes but also:
mix-blend-mode;Besides the new features, we’ve upgraded from Tkinter to SDL and Skia, which makes our browser faster and more responsive, and also sets a foundation for more work on browser performance to come.
Click here to try this chapter’s browser.
The complete set of functions, classes, and methods in our browser should now look something like this:
COOKIE_JAR
class URL:
    def __init__(url)

    def request(referrer, payload)

    def resolve(url)

    def origin()

    def __str__()
class Text:
    def __init__(text, parent)

    def __repr__()
class Element:
    def __init__(tag, attributes, parent)

    def __repr__()
def print_tree(node, indent)
def tree_to_list(tree, list)
class HTMLParser:
    SELF_CLOSING_TAGS

    HEAD_TAGS

    def __init__(body)

    def parse()

    def get_attributes(text)

    def add_text(text)

    def add_tag(tag)

    def implicit_tags(tag)

    def finish()
class CSSParser:
    def __init__(s)

    def whitespace()

    def literal(literal)

    def word()

    def ignore_until(chars)

    def pair()

    def selector()

    def body()

    def parse()
class TagSelector:
    def __init__(tag)

    def matches(node)
class DescendantSelector:
    def __init__(ancestor, descendant)

    def matches(node)
FONTS
def get_font(size, weight, style)
def linespace(font)
NAMED_COLORS
def parse_color(color)
def parse_blend_mode(blend_mode_str)
DEFAULT_STYLE_SHEET
INHERITED_PROPERTIES
def style(node, rules)
def cascade_priority(rule)
WIDTH, HEIGHT
HSTEP, VSTEP
INPUT_WIDTH_PX
BLOCK_ELEMENTS
class DocumentLayout:
    def __init__(node)

    def layout()

    def should_paint()

    def paint()

    def paint_effects(cmds)
class BlockLayout:
    def __init__(node, parent, previous)

    def layout_mode()

    def layout()

    def recurse(node)

    def new_line()

    def word(node, word)

    def input(node)

    def self_rect()

    def should_paint()

    def paint()

    def paint_effects(cmds)
class LineLayout:
    def __init__(node, parent, previous)

    def layout()

    def should_paint()

    def paint()

    def paint_effects(cmds)
class TextLayout:
    def __init__(node, word, parent, previous)

    def layout()

    def should_paint()

    def paint()

    def paint_effects(cmds)
class InputLayout:
    def __init__(node, parent, previous)

    def layout()

    def should_paint()

    def paint()

    def paint_effects(cmds)

    def self_rect()
class DrawText:
    def __init__(x1, y1, text, font, color)

    def execute(canvas)
class DrawRect:
    def __init__(rect, color)

    def execute(canvas)
class DrawRRect:
    def __init__(rect, radius, color)

    def execute(canvas)
class DrawLine:
    def __init__(x1, y1, x2, y2, color, thickness)

    def execute(canvas)
class DrawOutline:
    def __init__(rect, color, thickness)

    def execute(canvas)
class Blend:
    def __init__(opacity, blend_mode, children)

    def execute(canvas)
def paint_tree(layout_object, display_list)
def paint_visual_effects(node, cmds, rect)
EVENT_DISPATCH_JS
RUNTIME_JS
class JSContext:
    def __init__(tab)

    def run(script, code)

    def dispatch_event(type, elt)

    def get_handle(elt)

    def querySelectorAll(selector_text)

    def getAttribute(handle, attr)

    def innerHTML_set(handle, s)

    def XMLHttpRequest_send(...)
SCROLL_STEP
class Tab:
    def __init__(tab_height)

    def load(url, payload)

    def render()

    def allowed_request(url)

    def raster(canvas)

    def scrolldown()

    def click(x, y)

    def go_back()

    def submit_form(elt)

    def keypress(char)
class Chrome:
    def __init__(browser)

    def tab_rect(i)

    def paint()

    def click(x, y)

    def keypress(char)

    def enter()

    def blur()
class Browser:
    def __init__()

    def raster_tab()

    def raster_chrome()

    def draw()

    def new_tab(url)

    def handle_down()

    def handle_click(e)

    def handle_key(char)

    def handle_enter()

    def handle_quit()
def mainloop(browser)
11-1 Filters. The filter CSS property allows
specifying various kinds of more complex
effects, such as grayscale or blur. These are fun to implement, and
some, like blur, have built-in support in Skia. Implement
blur. Think carefully about when blurring occurs, relative
to other effects like transparency, clipping, and blending.
11-2 Hit testing. If you have an element with a
border-radius, it’s possible to click outside the element
but inside its containing rectangle, by clicking in the part of the
corner that is “rounded off”. This shouldn’t result in clicking on the
element, but in our browser it currently does. Modify the
click method to take border radii into account.
11-3 Interest region. Our browser now draws the whole web
page to a single surface, which means a very long web page (like this
chapter’s!) creates a large surface, thereby using a lot of memory.
Instead, only draw an “interest region” of limited height, say
4 * HEIGHT pixels. You’ll need to keep track of where the
interest region is on the page, draw the correct part of it to the
screen, and re-raster the interest region when the user attempts to
scroll outside of it. Use Skia’s clipRect operation to
avoid drawing outside the interest region.
11-4 Overflow scrolling. An element with the
overflow property set to scroll and a fixed
pixel height is scrollable. (You’ll want to implement
Exercise 6-2) so that height is supported.) Implement some
version of overflow: scroll. I recommend the following user
interaction: the user clicks within a scrollable element to focus it,
and then can press the arrow keys to scroll up and down. You’ll need to
keep track of the layout
overflow. For an extra challenge, make sure you support
scrollable elements nested within other scrollable elements.
11-5 Touch input. Many desktop (and all mobile, of course)
screens these days support touch and multitouch input. And SDL has APIs to
support it. Implement a touch-input variant of click.You might want to go back and
look at the “Go Further” block in Chapter 7
for some hints about good ways to implement touch
input.
Did you find this chapter useful?