
Our browser is still missing the key insight of hypertext: documents linked together by hyperlinks. It lets us watch the waves, but not surf the web. So in this chapter, we’ll implement hyperlinks, an address bar, and the rest of the browser interface—the part of the browser that decides which page we are looking at.
The core of the web is the link, so the most important part of the browser interface is clicking on links. But before we can quite get to clicking on links, we first need to answer a more fundamental question: where on the screen are the links? Though paragraphs and headings have their sizes and positions recorded in the layout tree, formatted text (like links) does not. We need to fix that.
The big idea is to introduce two new types of layout objects:
LineLayout and TextLayout. A
BlockLayout will now have a LineLayout child
for each line of text, which itself will contain a
TextLayout for each word in that line. These new classes
can make the layout tree look different from the HTML tree. So to avoid
surprises, let’s look at a simple example:
<html>
  <body>
    Here is some text that is
    <br>
    spread across multiple lines
  </body>
</html>
The text in the body element wraps across two lines
(because of the br element), so the layout tree will have
this structure:
DocumentLayout
  BlockLayout[block] (html element)
    BlockLayout[inline] (body element)
      LineLayout (first line of text)
        TextLayout ("Here")
        TextLayout ("is")
        TextLayout ("some")
        TextLayout ("text")
        TextLayout ("that")
        TextLayout ("is")
      LineLayout (second line of text)
        TextLayout ("spread")
        TextLayout ("across")
        TextLayout ("multiple")
        TextLayout ("lines")
Note how one body element corresponds to a
BlockLayout with two LineLayouts inside, and
how two text nodes turn into a total of ten
TextLayouts!
Let’s get started. Defining LineLayout is
straightforward:
class LineLayout:
    def __init__(self, node, parent, previous):
        self.node = node
        self.parent = parent
        self.previous = previous
        self.children = []
TextLayout is only a little more tricky. A single
TextLayout refers not to a whole HTML node but to a
specific word. That means TextLayout needs an extra
argument to know which word that is:
class TextLayout:
    def __init__(self, node, word, parent, previous):
        self.node = node
        self.word = word
        self.children = []
        self.parent = parent
        self.previous = previous
Like the other layout modes, LineLayout and
TextLayout will need their own layout and
paint methods, but before we get to those we need to think
about how the LineLayout and TextLayout
objects will be created. That has to happen during word wrapping.
Recall how word wrapping (see Chapter 3)
inside BlockLayout’s word method works. That
method updates a line field, which stores all the words in
the current line:
self.line.append((self.cursor_x, word, font, color))When it’s time to go to the next line, word calls
flush, which computes the location of the line and each
word in it, and adds all the words to a display_list field,
which stores all the words in the whole inline element. With
TextLayout and LineLayout, a lot of this
complexity goes away. The LineLayout can compute its own
location in its layout method, and instead of a
display_list field, each TextLayout can just
paint itself like normal. So let’s get started on this
refactor.
Let’s start with adding a word to a line. Instead of a
line field, we want to create TextLayout
objects and add them to LineLayout objects. The
LineLayouts are children of the BlockLayout,
so the current line can be found at the end of the children
array:
class BlockLayout:
    def word(self, node, word):
        # ...
        line = self.children[-1]
        previous_word = line.children[-1] if line.children else None
        text = TextLayout(node, word, line, previous_word)
        line.children.append(text)
Now let’s think about what happens when we reach the end of the line.
The current code calls flush, which does stuff like
positioning text and clearing the line field. We don’t want
to do all that—we just want to create a new LineLayout
object. So let’s use a different method for that:
class BlockLayout:
    def word(self, node, word):
        # ...
        if self.cursor_x + w > self.width:
            self.new_line()
This new_line method just creates a new line and resets
some fields:
class BlockLayout:
    def new_line(self):
        self.cursor_x = 0
        last_line = self.children[-1] if self.children else None
        new_line = LineLayout(self.node, self, last_line)
        self.children.append(new_line)
Now there are a lot of fields we’re not using. Let’s clean them up.
In the core layout method, we don’t need to initialize the
display_list, cursor_y or line
fields, since we won’t be using any of those any more. Instead, we just
need to call new_line and recurse:
class BlockLayout:
    def layout(self):
        # ...
        else:
            self.new_line()
            self.recurse(self.node)
The layout method already recurses into its children to
lay them out, so that part doesn’t need any change. And moreover, we can
now compute the height of a paragraph of text by summing the height of
its lines, so this part of the code no longer needs to be different
depending on the layout mode:
class BlockLayout:
    def layout(self):
        # ...
        self.height = sum([child.height for child in self.children])
You might also be tempted to delete the flush method,
since it’s no longer called from anywhere. But keep it around for just a
moment—we’ll need it to write the layout method for line
and text objects.
The layout objects generated by a text node need not even be consecutive. English containing a Farsi quotation, for example, can flip from left-to-right to right-to-left in the middle of a line. The text layout objects end up in a surprising order. And then there are languages laid out vertically…
We’re now creating line and text objects, but we still need to lay
them out. Let’s start with lines. Lines stack vertically and take up
their parent’s full width, so computing x and
y and width looks the same as for our other
boxes:You could reduce
the duplication with some helper methods (or even something more
elaborate, like mixin classes), but in a real browser different layout
modes support different kinds of extra features (like text direction or
margins) and the code looks quite different.
class LineLayout:
    def layout(self):
        self.width = self.parent.width
        self.x = self.parent.x

        if self.previous:
            self.y = self.previous.y + self.previous.height
        else:
            self.y = self.parent.y

        # ...
Computing height, though, is different—this is where computing
maximum ascents, maximum descents, and so on comes in. Before we do
that, let’s look at laying out TextLayouts.
To lay out text we need font metrics, so let’s start by getting the
relevant font using the same font-construction code as
BlockLayout:
class TextLayout:
    def layout(self):
        weight = self.node.style["font-weight"]
        style = self.node.style["font-style"]
        if style == "normal": style = "roman"
        size = int(float(self.node.style["font-size"][:-2]) * .75)
        self.font = get_font(size, weight, style)
Next, we need to compute the word’s size and x position.
We use the font metrics to compute size, and stack words left to right
to compute position.
class TextLayout:
    def layout(self):
        # ...

        self.width = self.font.measure(self.word)

        if self.previous:
            space = self.previous.font.measure(" ")
            self.x = self.previous.x + space + self.previous.width
        else:
            self.x = self.parent.x

        self.height = self.font.metrics("linespace")
There’s no code here to compute the y position, however.
The vertical position of one word depends on the other words in the same
line, so we’ll compute that y position inside
LineLayout’s layout method.The y position
could have been computed in TextLayout’s
layout method—but then that layout method would have to
come after the baseline computation, not before. Yet
font must be computed before the baseline
computation. A real browser might resolve this paradox with multi-phase
layout. There are many considerations and optimizations of this kind
that are needed to make text layout super fast.
That method will pilfer code from the old flush method.
First, let’s lay out each word:
class LineLayout:
    def layout(self):
        # ...
        for word in self.children:
            word.layout()
Next, we need to compute the line’s baseline based on the maximum
ascent and descent, using basically the same code as the old
flush method:
# ...
max_ascent = max([word.font.metrics("ascent")
                  for word in self.children])
baseline = self.y + 1.25 * max_ascent
for word in self.children:
    word.y = baseline - word.font.metrics("ascent")
max_descent = max([word.font.metrics("descent")
            for word in self.children])
Note that this code is reading from a font field on each
word and writing to each word’s y field. That means that
inside TextLayout’s layout method we need to
compute x, width, height , and
font, but not y, exactly how we did it.
Finally, since each line is now a standalone layout object, it needs to have a height. We compute it from the maximum ascent and descent:
# ...
self.height = 1.25 * (max_ascent + max_descent)
So that’s layout for LineLayout and
TextLayout. All that’s left is painting. For
LineLayout there is nothing to paint:
class LineLayout:
    def paint(self):
        return []
And each TextLayout creates a single
DrawText call:
class TextLayout:
    def paint(self):
        color = self.node.style["color"]
        return [DrawText(self.x, self.y, self.word, self.font, color)]
Now we don’t need a display_list field in
BlockLayout, and we can also remove the part of
BlockLayout’s paint that handles it. Instead,
paint_tree can just recurse into its children and paint
them. So by adding LineLayout and TextLayout
we made BlockLayout quite a bit simpler and shared more
code between block and inline layout modes.
So, oof, well, this was quite a bit of refactoring. Take a moment to test everything—it should look exactly identical to how it did before we started this refactor. But while you can’t see it, there’s a crucial difference: each blue link on the page now has an associated layout object and its own size and position.
Actually, text rendering is way more complex than this. Letters can transform and overlap, and the user might want to color certain letters—or parts of letters—a different color. All of this is possible in HTML, and real browsers do implement support for it.
Now that we know where the links are, we can work on clicking them.
In Tk, click handling works just like key press handling: you bind an
event handler to a certain event. For click handling that event is
<Button-1>, button number 1 being the left button on
the mouse.Button 2 is
the middle button; button 3 is the right-hand button.
class Browser:
    def __init__(self):
        # ...
        self.window.bind("<Button-1>", self.click)
Inside click, we want to figure out what link the user
has clicked on. Luckily, the event handler is passed an event object,
whose x and y fields refer to where the click
happened:
class Browser:
    def click(self, e):
        x, y = e.x, e.y
Now, here, we have to be careful with coordinate systems. Those x and y coordinates are relative to the browser window. Since the canvas is in the top-left corner of the window, those are also the x and y coordinates relative to the canvas. We want the coordinates relative to the web page, so we need to account for scrolling:
class Browser:
    def click(self, e):
        # ...
        y += self.scroll
More generally, handling events like clicks involves reversing the usual rendering pipeline. Normally, rendering goes from elements to layout objects to page coordinates to screen coordinates; click handling goes backward, starting with screen coordinates, then converting to page coordinates, and so on. The correspondence isn’t perfectly reversed in practiceThough see some exercises in this chapter and future ones on making it a closer match. but it’s a worthwhile analogy.
So the next step is to go from page coordinates to a layout object:You could try to first find the paint command clicked on, and go from that to layout object, but in real browsers there are all sorts of reasons this won’t work, starting with invisible objects that can nonetheless be clicked on. See Exercise 7-11.
# ...
objs = [obj for obj in tree_to_list(self.document, [])
        if obj.x <= x < obj.x + obj.width
        and obj.y <= y < obj.y + obj.height]
In principle there might be more than one layout object in this
list.In real browsers
there are all sorts of ways this could happen, like negative
margins. But remember that click handling is the reverse
of painting. When we paint, we paint the tree from front to back, so
when hit testing we should start at the last element:Real browsers use the
z-index property to control which sibling is on top. So
real browsers have to compute stacking
contexts to resolve what you actually clicked on.
# ...
if not objs: return
elt = objs[-1].node
This elt node is the most specific node that was
clicked. With a link, that’s usually going to be a text node. But since
we want to know the actual URL the user clicked on, we need to climb
back up the HTML tree to find the link element:I wrote this in a kind of
curious way so it’s easy to add other types of clickable things—like
text boxes and buttons—in Chapter
8.
# ...
while elt:
    if isinstance(elt, Text):
        pass
    elif elt.tag == "a" and "href" in elt.attributes:
        # ...
    elt = elt.parent
Once we find the link element itself, we need to extract the URL and load it:
# ...
elif elt.tag == "a" and "href" in elt.attributes:
    url = self.url.resolve(elt.attributes["href"])
    return self.load(url)
Note that this resolve call requires storing the current
page’s URL:
class Browser:
    def __init__(self):
        # ...
        self.url = None

    def load(self, url):
        self.url = url
        # ...
Try it out! You should now be able to click on links and navigate to new web pages.
On mobile devices, a “click” happens over an area, not just at a single point. This is because mobile “taps” are often pretty inaccurate, so clicks should use area, not point information for “hit testing”. This can happen even with a normal mouse click when the click is on a rotated or scaled element.
If you’re anything like me, the next thing you tried after clicking on links is middle-clicking them to open in a new tab. Every browser now has tabbed browsing, and honestly it’s a little embarrassing that our browser doesn’t.Back in the day, browser tabs were the feature that would convince friends and relatives to switch from IE 6 to Firefox.
Fundamentally, implementing tabbed browsing requires us to distinguish between the browser itself and the tabs that show individual web pages. The canvas the browser draws to, for example, is shared by all web pages, but the layout tree and display list are specific to one page. We need to tease tabs and browsers apart.
Here’s the plan: the Browser class will own the window
and canvas and all related methods, such as event handling. And it’ll
also contain a list of Tab objects and the browser chrome.
But the web page itself and its associated methods will live in a new
Tab class.
To start, rename your existing Browser class to be just
Tab, since until now we’ve only handled a single web
page:
class Tab:
    # ...
Then we’ll need a new Browser class. It has to store a
list of tabs and also which one is active:
class Browser:
    def __init__(self):
        self.tabs = []
        self.active_tab = None
It also owns the window and handles all events:
class Browser:
    def __init__(self):
        self.window = tkinter.Tk()
        self.canvas = tkinter.Canvas(
            # ...
        )
        self.canvas.pack()
        self.window.bind("<Down>", self.handle_down)
        self.window.bind("<Button-1>", self.handle_click)
Remove these lines from Tab’s constructor.
The handle_down and handle_click methods
need page-specific information, so these handler methods just forward
the event to the active tab:
class Browser:
    def handle_down(self, e):
        self.active_tab.scrolldown()
        self.draw()

    def handle_click(self, e):
        self.active_tab.click(e.x, e.y)
        self.draw()
You’ll need to tweak the Tab’s scrolldown
and click methods:
scrolldown now takes no arguments (instead of an event
object)click now takes two coordinates (instead of an event
object)Finally, the Browser’s draw call also calls
into the active tab:
class Browser:
    def draw(self):
        self.canvas.delete("all")
        self.active_tab.draw(self.canvas)
Note that clearing the screen is the Browser’s job, not
the Tab’s. After that, we only draw the active tab, which
is how tabs are supposed to work. Tab’s draw
method needs to take the canvas in as an argument:
class Tab:
    def draw(self, canvas):
        # ...
Since the Browser controls the canvas and handles
events, it decides when rendering happens and which tab does the
drawing. So let’s also remove the draw calls from the
load and scrolldown methods. More generally,
the Browser is “active” and the Tab is
“passive”: all user interactions start at the Browser,
which then calls into the tabs as appropriate.
We’re basically done splitting Tab from
Browser, and after a refactor like this we need to test
things. To do that, we’ll need to create at least one tab, like
this:
class Browser:
    def new_tab(self, url):
        new_tab = Tab()
        new_tab.load(url)
        self.active_tab = new_tab
        self.tabs.append(new_tab)
        self.draw()
On startup, you should now create a Browser with one
tab:
if __name__ == "__main__":
    import sys
    Browser().new_tab(URL(sys.argv[1]))
    tkinter.mainloop()
Of course, we need a way for the user to switch tabs, create new ones, and so on. Let’s turn to that next.
Browser tabs first appeared in SimulBrowse, which was a kind of custom UI for the Internet Explorer engine.Some people instead attribute tabbed browsing to Booklink’s InternetWorks browser, a browser obscure enough that it doesn’t have a Wikipedia page, though you can see some screenshots on Twitter. However, its tabs were slightly different from the modern conception, more like bookmarks or history than tabs. SimulBrowse instead used the modern notion of tabs. SimulBrowse (later renamed to NetCaptor) also had ad blocking and a private browsing mode. The old advertisements are a great read!
Real web browsers don’t just show web page contents—they’ve got labels and icons and buttons.Oh my! This is called the browser “chrome”;Yep, that predates and inspired the name of Google’s Chrome browser. all of this stuff is drawn by the browser to the same window as the page contents, and it requires information about the browser as a whole (like the list of all tabs), so it has to happen at the browser level, not per tab.
However, a browser’s UI is quite complicated, so let’s put that code
in a new Chrome helper class:
class Chrome:
    def __init__(self, browser):
        self.browser = browser

class Browser:
    def __init__(self):
        # ...
        self.chrome = Chrome(self)
Let’s design the browser chrome. Ultimately, I think it should have two rows (see Figure 1):
At the top, a list of tab names, separated by vertical lines, and
a “+” button to add a new tab.
Underneath, the URL of the current web page, and a
“<” button to represent the browser back
button.
A lot of this design involves text, so let’s start by picking a font:
class Chrome:
    def __init__(self, browser):
        # ...
        self.font = get_font(20, "normal", "roman")
        self.font_height = self.font.metrics("linespace")
Because different operating systems draw fonts differently, we’ll
need to adjust the exact design of the browser chrome based on font
metrics. So we’ll need the font_height later.I chose 20px as
the font size, but that might be too large on your device. Feel free to
adjust.
Using that font height, we can now determine where the tab bar starts and ends:
class Chrome:
    def __init__(self, browser):
        # ...
        self.padding = 5
        self.tabbar_top = 0
        self.tabbar_bottom = self.font_height + 2*self.padding
Note that I’ve added some padding so that text doesn’t run into the edge of the window.
We will store rectangles representing the size of various elements in
the browser chrome. For that, a new Rect class will be
convenient:
class Rect:
    def __init__(self, left, top, right, bottom):
        self.left = left
        self.top = top
        self.right = right
        self.bottom = bottom
Now, this tab row needs to contain a new-tab button and the tab names themselves.
I’ll add padding around the new-tab button:
class Chrome:
    def __init__(self, browser):
        # ...
        plus_width = self.font.measure("+") + 2*self.padding
        self.newtab_rect = Rect(
           self.padding, self.padding,
           self.padding + plus_width,
           self.padding + self.font_height)
Then the tabs will start padding past the end of the
new-tab button. Because the number of tabs can change, I’m not going to
store the location of each tab. Instead I’ll just compute their bounds
on the fly:
class Chrome:
    def tab_rect(self, i):
        tabs_start = self.newtab_rect.right + self.padding
        tab_width = self.font.measure("Tab X") + 2*self.padding
        return Rect(
            tabs_start + tab_width * i, self.tabbar_top,
            tabs_start + tab_width * (i + 1), self.tabbar_bottom)
Note that I measure the text “Tab X” and use that for all of the tab widths. This is not quite right—in many fonts, numbers like 8 are wider than numbers like 1—but it is close enough, and anyway, the letter X is typically as wide as the widest number.
To actually draw the UI, we’ll first have the browser chrome paint a
display list, which the Browser will then draw to the
screen:
class Chrome:
    def paint(self):
        cmds = []
        # ...
        return cmds
Let’s start by first painting the new-tab button:
class Chrome:
    def paint(self):
        # ...
        cmds.append(DrawOutline(self.newtab_rect, "black", 1))
        cmds.append(DrawText(
            self.newtab_rect.left + self.padding,
            self.newtab_rect.top,
            "+", self.font, "black"))
        # ...
The DrawOutline command draws a rectangular border:
class DrawOutline:
    def __init__(self, rect, color, thickness):
        self.rect = rect
        self.color = color
        self.thickness = thickness

    def execute(self, scroll, canvas):
        canvas.create_rectangle(
            self.rect.left, self.rect.top - scroll,
            self.rect.right, self.rect.bottom - scroll,
            width=self.thickness,
            outline=self.color)
Next up is drawing the tabs. Python’s enumerate function
lets you iterate over both the indices and the contents of an array at
the same time. For each tab, we need to create a border on the left and
right and then draw the tab name:
class Chrome:
    def paint(self):
        # ...
        for i, tab in enumerate(self.browser.tabs):
            bounds = self.tab_rect(i)
            cmds.append(DrawLine(
                bounds.left, 0, bounds.left, bounds.bottom,
                "black", 1))
            cmds.append(DrawLine(
                bounds.right, 0, bounds.right, bounds.bottom,
                "black", 1))
            cmds.append(DrawText(
                bounds.left + self.padding, bounds.top + self.padding,
                "Tab {}".format(i), self.font, "black"))
        # ...
Finally, to identify which tab is the active tab, we’ve got to make that file folder shape with the current tab sticking up:
class Chrome:
    def paint(self):
        for i, tab in enumerate(self.browser.tabs):
            # ...
            if tab == self.browser.active_tab:
                cmds.append(DrawLine(
                    0, bounds.bottom, bounds.left, bounds.bottom,
                    "black", 1))
                cmds.append(DrawLine(
                    bounds.right, bounds.bottom, WIDTH, bounds.bottom,
                    "black", 1))
The DrawLine command draws a line of a given color and
thickness. It’s defined like so:
class DrawLine:
    def __init__(self, x1, y1, x2, y2, color, thickness):
        self.rect = Rect(x1, y1, x2, y2)
        self.color = color
        self.thickness = thickness

    def execute(self, scroll, canvas):
        canvas.create_line(
            self.rect.left, self.rect.top - scroll,
            self.rect.right, self.rect.bottom - scroll,
            fill=self.color, width=self.thickness)
One final thing: we want to make sure that the browser chrome is always drawn on top of the page contents. To guarantee that, we can draw a white rectangle behind the chrome:
class Chrome:
    def __init__(self, browser):
        # ...
        self.bottom = self.tabbar_bottom

    def paint(self):
        # ...
        cmds.append(DrawRect(
            Rect(0, 0, WIDTH, self.bottom),
            "white"))
        cmds.append(DrawLine(
            0, self.bottom, WIDTH,
            self.bottom, "black", 1))
        # ...
Make sure the background is drawn before any other part of the
chrome. I also added a line at the bottom of the chrome to separate it
from the page. Note how I also changed DrawRect to pass a
Rect instead of the four corners; this requires a change to
BlockLayout:
class BlockLayout:
    def self_rect(self):
        return Rect(self.x, self.y,
            self.x + self.width, self.y + self.height)

    def paint(self):
        # ...
        if bgcolor != "transparent":
            rect = DrawRect(self.self_rect(), bgcolor)
            cmds.append(rect)
        return cmds
Add a rect field to DrawText and
DrawLine too. (The width and height for
DrawText should be the width and height of the text.)
Drawing this chrome display list is now straightforward:
class Browser:
    def draw(self):
        # ...
        for cmd in self.chrome.paint():
            cmd.execute(0, self.canvas)
Note that this display list is always drawn at the top of the window, unlike the tab contents (which scroll). Make sure to draw the chrome after the main tab contents, so that the chrome is drawn over it.
However, we also have to make some adjustments to tab drawing to
account for the fact that the browser chrome takes up some vertical
space. Let’s add a tab_height parameter to
Tabs:
class Tab:
    def __init__(self, tab_height):
        # ...
        self.tab_height = tab_height
We can pass it to new_tab:
class Browser:
    def new_tab(self, url):
        new_tab = Tab(HEIGHT - self.chrome.bottom)
        # ...
We can then adjust scrolldown to account for the height
of the page content now being tab_height:
class Tab:
    def scrolldown(self):
        max_y = max(
            self.document.height + 2*VSTEP - self.tab_height, 0)
        self.scroll = min(self.scroll + SCROLL_STEP, max_y)
Finally, in Tab’s draw method we need to
shift the drawing commands down by the chrome height. I’ll pass the
chrome height in as an offset parameter:
class Tab:
    def draw(self, canvas, offset):
        for cmd in self.display_list:
            if cmd.rect.top > self.scroll + self.tab_height:
                continue
            if cmd.rect.bottom < self.scroll: continue
            cmd.execute(self.scroll - offset, canvas)
The Browser’s final draw method now looks
like this:
class Browser:
    def draw(self):
        self.canvas.delete("all")
        self.active_tab.draw(self.canvas, self.chrome.bottom)
        for cmd in self.chrome.paint():
            cmd.execute(0, self.canvas)
One more thing: clicking on tabs to switch between them. The
Browser handles the click and now needs to delegate clicks
on the browser chrome to the Chrome object:
class Browser:
    def handle_click(self, e):
        if e.y < self.chrome.bottom:
            self.chrome.click(e.x, e.y)
        else:
            tab_y = e.y - self.chrome.bottom
            self.active_tab.click(e.x, tab_y)
        self.draw()
Note that we need to subtract out the chrome size when clicking on
tab contents. As for clicks on the browser chrome, inside
Chrome we need to figure out what the user clicked on. To
make that easier, let’s add a quick method to test whether a point is
contained in a Rect:
class Rect:
    def contains_point(self, x, y):
        return x >= self.left and x < self.right \
            and y >= self.top and y < self.bottom
We use this method to handle clicks inside Chrome, and
then use it to choose between clicking to add a tab or select an open
tab.
class Chrome:
    def click(self, x, y):
        if self.newtab_rect.contains_point(x, y):
            self.browser.new_tab(URL("https://browser.engineering/"))
        else:
            for i, tab in enumerate(self.browser.tabs):
                if self.tab_rect(i).contains_point(x, y):
                    self.browser.active_tab = tab
                    break
That’s an appropriate “new tab” page, don’t you think? Anyway, you should now be able to load multiple tabs, scroll and click around them independently, and switch tabs by clicking on them.
Google Chrome 1.0 was accompanied by a comic book to pitch its features. There’s a whole chapter about its design ideas and user interface features, many of which stuck around. Even this book’s browser has tabs on top, for example.
Now that we are navigating between pages all the time, it’s easy to get a little lost and forget what web page you’re looking at. An address bar that shows the current URL would help a lot. Let’s make room for it in the chrome:
class Chrome:
    def __init__(self, browser):
        # ...
        self.urlbar_top = self.tabbar_bottom
        self.urlbar_bottom = self.urlbar_top + \
            self.font_height + 2*self.padding
        self.bottom = self.urlbar_bottom
This “URL bar” will contain the back button and the address bar:
class Chrome:
    def __init__(self, browser):
        # ...
        back_width = self.font.measure("<") + 2*self.padding
        self.back_rect = Rect(
            self.padding,
            self.urlbar_top + self.padding,
            self.padding + back_width,
            self.urlbar_bottom - self.padding)

        self.address_rect = Rect(
            self.back_rect.top + self.padding,
            self.urlbar_top + self.padding,
            WIDTH - self.padding,
            self.urlbar_bottom - self.padding)
Painting the back button is straightforward:
class Chrome:
    def paint(self):
        # ...
        cmds.append(DrawOutline(self.back_rect, "black", 1))
        cmds.append(DrawText(
            self.back_rect.left + self.padding,
            self.back_rect.top,
            "<", self.font, "black"))
The address bar needs to get the current tab’s URL from the browser:
class Chrome:
    def paint(self):
        # ...
        cmds.append(DrawOutline(self.address_rect, "black", 1))
        url = str(self.browser.active_tab.url)
        cmds.append(DrawText(
            self.address_rect.left + self.padding,
            self.address_rect.top,
            url, self.font, "black"))
Here, str is a built-in Python function that we can
override to correctly convert URL objects to strings:
class URL:
    def __str__(self):
        port_part = ":" + str(self.port)
        if self.scheme == "https" and self.port == 443:
            port_part = ""
        if self.scheme == "http" and self.port == 80:
            port_part = ""
        return self.scheme + "://" + self.host + port_part + self.path
I think the extra logic to hide port numbers is worth it to make the URLs more tidy.
What should happen when the back button is clicked? Well, that
tab should go back. Other tabs are not affected. So the
Browser has to invoke some method on the current tab to go
back:
class Chrome:
    def click(self, x, y):
        # ...
        elif self.back_rect.contains_point(x, y):
            self.browser.active_tab.go_back()
For the active tab to “go back”, it needs to store a “history” of which pages it’s visited before:
class Tab:
    def __init__(self, tab_height):
        # ...
        self.history = []
The history grows every time we go to a new page:
class Tab:
    def load(self, url):
        self.history.append(url)
        # ...
Going back uses that history. You might think to write this:
class Tab:
    def go_back(self):
        if len(self.history) > 1:
            self.load(self.history[-2])
That’s almost correct, but it doesn’t work if you click the back
button twice, because load adds to the history. Instead, we
need to do something more like this:
class Tab:
    def go_back(self):
        if len(self.history) > 1:
            self.history.pop()
            back = self.history.pop()
            self.load(back)
Now, going back shrinks the history and clicking on links grows it, as it should.
So we’ve now got a pretty good web browser for reading this very book: you can click links, browse around, and even have multiple chapters open simultaneously for cross-referencing things. But it’s a little hard to visit a website not linked to from the current one.
A browser’s navigation history can contain sensitive information
about which websites a user likes visiting, so keeping it secure is
important. Surprisingly, this is pretty hard, because CSS features like
the :visited
selector can be used to check
whether a URL has been visited before. For this reason, there are efforts
to restrict :visited.
One way to go to another page is by clicking on a link. But most browsers also allow you to type into the address bar to visit a new URL, if you happen to know the URL.
Take a moment to notice the complex ritual of typing in an address (see Figure 2):
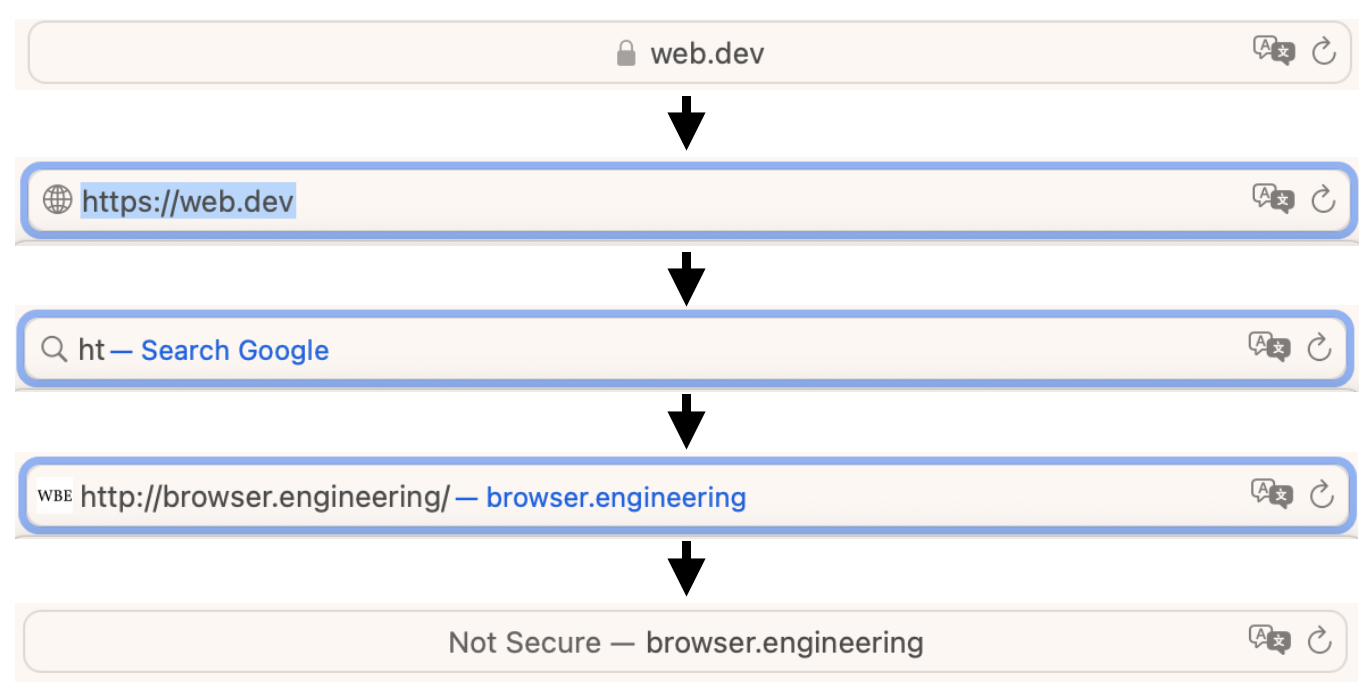
These steps suggest that the browser stores the contents of the
address bar separately from the url field, and also that
there’s some state to say whether you’re currently typing into the
address bar. Let’s call the contents address_bar and the
state focus:
class Chrome:
    def __init__(self, browser):
        # ...
        self.focus = None
        self.address_bar = ""
Clicking on the address bar should set focus and
clicking outside it should clear focus:
class Chrome:
    def click(self, x, y):
        self.focus = None
        # ...
        elif self.address_rect.contains_point(x, y):
            self.focus = "address bar"
            self.address_bar = ""
Note that clicking on the address bar also clears the address bar contents. That’s not quite what a real browser does, but it’s pretty close, and it lets us skip adding text selection.
Now, when we draw the address bar, we need to check whether to draw the current URL or the currently typed text:
class Chrome:
    def paint(self):
        # ...
        if self.focus == "address bar":
            cmds.append(DrawText(
                self.address_rect.left + self.padding,
                self.address_rect.top,
                self.address_bar, self.font, "black"))
        else:
            url = str(self.browser.active_tab.url)
            cmds.append(DrawText(
                self.address_rect.left + self.padding,
                self.address_rect.top,
                url, self.font, "black"))
When the user is typing in the address bar, let’s also draw a cursor. Making states (like focus) visible on the screen (like with the cursor) makes software easier to use:
class Chrome:
    def paint(self):
        # ...
        if self.focus == "address bar":
            # ...
            w = self.font.measure(self.address_bar)
            cmds.append(DrawLine(
                self.address_rect.left + self.padding + w,
                self.address_rect.top,
                self.address_rect.left + self.padding + w,
                self.address_rect.bottom,
                "red", 1))
Next, when the address bar is focused, we need to support typing in a
URL. In Tk, you can bind to <Key> to capture all key
presses. The event object’s char field contains the
character the user typed.
class Browser:
    def __init__(self):
        # ...
        self.window.bind("<Key>", self.handle_key)

    def handle_key(self, e):
        if len(e.char) == 0: return
        if not (0x20 <= ord(e.char) < 0x7f): return
        self.chrome.keypress(e.char)
        self.draw()
This handle_key handler starts with some conditions:
<Key> fires for every key press, not just regular
letters, so we want to ignore cases where no character is typed (a
modifier key is pressed) or the character is outside the ASCII range
(which can represent the arrow keys or function keys). For now let’s
have the Browser send all key presses to
Chrome and then call draw() so that the new
letters actually show up.
Then Chrome can check focus and add on to
address_bar:
class Chrome:
    def keypress(self, char):
        if self.focus == "address bar":
            self.address_bar += char
Finally, once the new URL is entered, we need to handle the “Enter”
key, which Tk calls <Return>, and actually send the
browser to the new address:
class Chrome:
    def enter(self):
        if self.focus == "address bar":
            self.browser.active_tab.load(URL(self.address_bar))
            self.focus = None

class Browser:
    def __init__(self):
        # ...
        self.window.bind("<Return>", self.handle_enter)

    def handle_enter(self, e):
        self.chrome.enter()
        self.draw()
So there—after a long chapter, you can now unwind a bit by surfing the web.
Text editing is surprisingly complex, and can be pretty tricky to implement well, especially for languages other than English. And nowadays URLs can be written in any language, though modern browsers restrict this somewhat for security reasons.
It’s been a lot of work just to handle links! We had to:
Now just imagine all the features you can add to your browser!
And here’s the lab 7 browser. Try using the browser chrome—it works! Our browser is starting to look like a real one:
The complete set of functions, classes, and methods in our browser should now look something like this:
class URL:
    def __init__(url)

    def request()

    def resolve(url)

    def __str__()
class Text:
    def __init__(text, parent)

    def __repr__()
class Element:
    def __init__(tag, attributes, parent)

    def __repr__()
def print_tree(node, indent)
def tree_to_list(tree, list)
class HTMLParser:
    SELF_CLOSING_TAGS

    HEAD_TAGS

    def __init__(body)

    def parse()

    def get_attributes(text)

    def add_text(text)

    def add_tag(tag)

    def implicit_tags(tag)

    def finish()
class CSSParser:
    def __init__(s)

    def whitespace()

    def literal(literal)

    def word()

    def ignore_until(chars)

    def pair()

    def selector()

    def body()

    def parse()
class TagSelector:
    def __init__(tag)

    def matches(node)
class DescendantSelector:
    def __init__(ancestor, descendant)

    def matches(node)
FONTS
def get_font(size, weight, style)
DEFAULT_STYLE_SHEET
INHERITED_PROPERTIES
def style(node, rules)
def cascade_priority(rule)
WIDTH, HEIGHT
HSTEP, VSTEP
class Rect:
    def __init__(left, top, right, bottom)

    def contains_point(x, y)
BLOCK_ELEMENTS
class DocumentLayout:
    def __init__(node)

    def layout()

    def paint()
class BlockLayout:
    def __init__(node, parent, previous)

    def layout_mode()

    def layout()

    def recurse(node)

    def new_line()

    def word(node, word)

    def self_rect()

    def paint()
class LineLayout:
    def __init__(node, parent, previous)

    def layout()

    def paint()
class TextLayout:
    def __init__(node, word, parent, previous)

    def layout()

    def paint()
class DrawText:
    def __init__(x1, y1, text, font, color)

    def execute(scroll, canvas)
class DrawRect:
    def __init__(rect, color)

    def execute(scroll, canvas)
class DrawLine:
    def __init__(x1, y1, x2, y2, color, thickness)

    def execute(scroll, canvas)
class DrawOutline:
    def __init__(rect, color, thickness)

    def execute(scroll, canvas)
def paint_tree(layout_object, display_list)
SCROLL_STEP
class Tab:
    def __init__(tab_height)

    def load(url)

    def draw(canvas, offset)

    def scrolldown()

    def click(x, y)

    def go_back()
class Chrome:
    def __init__(browser)

    def tab_rect(i)

    def paint()

    def click(x, y)

    def keypress(char)

    def enter()
class Browser:
    def __init__()

    def draw()

    def new_tab(url)

    def handle_down(e)

    def handle_click(e)

    def handle_key(e)

    def handle_enter(e)
7-1 Backspace. Add support for the backspace key when typing in the address bar. Honestly, do this exercise just for your sanity.
7-2 Middle-click. Add support for middle-clicking on a link
(Button-2) to open it in a new tab. You might want to use a
mouse when testing.
7-3 Window title. Browsers set their window title to the
contents of the current tab’s <title> element. Make
your browser do the same. (You can call the title method of
Browser.window to change the window title.)
7-4 Forward. Add a forward button, which should undo the back button. If the most recent navigation action wasn’t a back button, the forward button shouldn’t do anything.To accomplish this, you’ll need to keep around history items when clicking the back button, and store an index into it for the current page, instead of removing them entirely from the array. Draw it in gray in that case, so the user isn’t stuck wondering why it doesn’t work. Also draw the back button in gray if there’s nowhere to go back to.
7-5 Fragments. URLs can contain a fragment, which
comes at the end of a URL and is separated from the path by a hash sign
#. When the browser navigates to a URL with a fragment, it
should scroll the page so that the element with that identifier is at
the top of the screen. Also, implement fragment links: relative URLs
that begin with a # don’t load a new page, but instead
scroll the element with that identifier to the top of the screen. The
table of contents on the web version of this
chapter uses fragment links.
7-6 Search. If the user types something that’s not
a URL into the address bar, make your browser automatically search for
it with a search engine. This usually means going to a special URL. For
example, you can search Google by going to
https://google.com/search?q=QUERY, where QUERY
is the search query with every space replaced by a +
sign.Actually, you need
to escape lots of
punctuation characters in these “query strings”, but that’s kind of
orthogonal to this address bar search feature.
7-7 Visited links. In real browsers, links you’ve visited before are usually purple. Implement that feature. You’ll need to store the set of visited URLs, annotate the corresponding HTML elements, and check those annotations when drawing the text.Real browsers support special pseudo-class selectors that select all visited links, which you could implement if you want.
7-8 Bookmarks. Implement basic bookmarks. Add a
button to the browser chrome; clicking it should bookmark the page. When
you’re looking at a bookmarked page, that bookmark button should look
different (maybe yellow?) to remind the user that the page is
bookmarked, and clicking it should un-bookmark it. Add a special web
page, about:bookmarks, for viewing the list of
bookmarks.
7-9 Cursor. Make the left and right arrow keys move the text cursor around the address bar when it is focused. Pressing the backspace key should delete the character before the cursor, and typing other keys should add characters at the cursor. (Remember that the cursor can be before the first character or after the last!)
7-10 Multiple windows. Add support for multiple browser
windows in addition to tabs. This will require keeping track of multiple
Tk windows and canvases and grouping tabs by their containing window.
You’ll also need some way to create a new window, perhaps with a
keypress such as Ctrl+N.
7-11 Clicks via the display list. At the moment, our browser converts a click location to page coordinates and then finds the layout object at those coordinates. But you could instead first look up the draw command at that location, and then go from the draw command to the layout object that generated it. Implement this. You’ll need draw commands to know which layout object generated them.Real browsers don’t currently do this, but it’s an attractive possibility: display lists are pure data structures so access to them is easier to optimize or parallelize than the more complicated layout tree.
Did you find this chapter useful?